Task 1 -Research
Market Research
Donkey Kong 64 (Sean)
Overview
Donkey Kong 64 is a 3D platforming collect-a-thon game, where you play as Donkey Kong and his friends. The game starts with King K. Rool kidnapping Donkey Kong’s friends, scattering them around this games setting, DK Isle. You must explore each area of the island and stop KKR from powering up his Blast-O-Matic and destroying the island.
Further into the game, there is a section in Frantic Factory, the 4th area of the game, where you must interact with an arcade machine to play the original Donkey Kong arcade game to progress. It costs 2 coins to play, and must be played as Donkey Kong. You have to play the game twice, once to save Pauline like in the classic game, and a second time to unlock the Nintendo 64 Coin, which is one of two items used to access the final boss, King Krusha K. Rool.
USPs
Diverse Playable Characters
Unlike earlier Donkey Kong games, DK64 has multiple playable characters, each with their own move set and abilites. The game features the DK Crew, which is Donkey Kong, Diddy Kong, Lanky Kong, Tiny Kong and Chunky Kong, each introduced through the games intro music video, the “DK Rap”.
Each character is used to solve different puzzles and collect bananas specific to them, such as Lanky Kong’s Baboon Balloon ability, which lets him inflate to reach areas other characters otherwise couldn’t get to, or Tiny Kong’s Pony Tail Twirl ability which lets her hover mid air.
Multiple Game Modes
Donkey Kong 64 has multiple modes which the player can access. Some of these include the traditional normal platform puzzler, a shooting gallery minigame, a build of the original arcade Donkey Kong, a slot machine minigame, and a minecart minigame where you dodge TNT barrels. All of these minigames are called Bonus Stages in-game, and are accessible in multiple levels.
Massive Worlds
Each area in Donkey Kong 64 is quite large by Nintendo 64 standards. Nowadays, these levels may feel smaller than what most are used to with the rise of large open world titles, but by the standards in 1999, these levels would be ground-breaking, so large in fact that the game needed the Expansion Pak to run because it needed the extra memory to allow for better resolution and more rendered on screen at once.
Audience
Donkey Kong 64 released in 1999 with the PEGI rating of 7 and an ESRB rating of E. The game sold 5.2 million copies and is generally favoured as a game. It provided a breath of fresh air for the Donkey Kong franchise, being the only game in the series to date which is a fully 3D platformer - earlier titles were 2D platformers, later titles were also 2D platformers but with 3D models, commonly referred to as a 2.5D game, or a racing game.
Visual Styles
Donkey Kong 64 has a very aesthetically pleasing visual style, and is perfect for the target audience of generally teens/people under 16. The game has a nice and uniquely colourful environment, with the classic look of the DK Crew, but in full 3D. Each character is also visually distinct; Donkey Kong is big and bulky, Lanky Kong is tall and thin, Diddy Kong is small and nimble. Each level in the game has a clear distinctive theme, with it’s own colour palette.
Strengths
Donkey Kong 64 has various strengths and plays to them spectacularly, such as it’s variety of characters, it’s massive worlds and levels filled with minigames and activities and things to do while exploring the lands, as well as its collectathon style of gameplay, boasting multiple types of collectables to get, such as Golden Bananas, Coins and Blueprints. The game also features a multiplayer mode where you can play minigames as a group. The game has a very lively sense of humour with its characters and their personality
Weaknesses
Unfortunately, Donkey Kong 64 has relatively repetitive gameplay, with most of the collectathon mechanics feeling repetitive and tedious after a while. Finding everything needs a lot of backtracking and switching characters which can feel very slow and can break the flow of the game. The game also has some very complex and obscure puzzle mechanics and designs which can lead to frustration.
Burnout Paradise - Marked Man (Sean)
Overview
The Marked Man mode in Burnout Paradise is a unique mode where you are the Marked Man, who is being hunted by AI drivers who actively try to take you out and run you off the road in the aim of getting a takedown and totalling your car before you make it to your specific end point, which is one of 8 locations, one for each cardinal direction, and one for each intercardinal/ordinal direction.
USPs
Intense Pursuits
The mode makes sure to keep the player attentive, with the takedown cars being constantly on you. If you ever find yourself without a car on you, it won’t be long before one comes from a random road out the way and tries to take you off the road and into a wall; this sudden change in having cars on you to having nothing can create a sense of paranoia for the player, with them always expecting a car to come from nowhere.
Open World Freedom makes Unique Routes
The game is set in Paradise City, which features tons of different connected roads which leads to multiple ways to get around and get to the various areas to win. This works amazingly with Marked Man, as it encourages a sense of creativity to find a path that can make your race easy, or the AI unable to get to you. For example, there is a set of train tracks on the North East side heading to the Conservatory over some bridges. Taking this route breaks the AI completely and they can’t get to you until you re-join the main road.
Dynamic Damage
Throughout Paradise City, there is a number of Auto Repairs, Paint Shops and Gas Stations which can benefit you beautifully throughout your run. The appearance of an Auto Repair can be the matter of life and death if you made enough mistakes through your run. If you get damaged too many times and total your car around 5 times, you become damage critical, which you can only remove by winning, or by going through an Auto Repair.
Replayability
This mode offers plenty of replayability, since the AI will never come at you the same way twice. The ability for them to surprise you in each race is a very good feature to keep players playing the mode, and not getting bored of the same race every time like they could with a normal race. The randomness and unpredictability of the traffic helps add to this.
Audience
The target audience is basically the same as previous games in the Burnout series, which is people who are fans of arcade racers who like fast paced racing around crowded areas, but also to people who like a bit of a challenge with the licence system and dynamic AI which have a very reasonable rubberbanding.
Visual Styles
Burnout Paradise has a combined style of stylized realism and vibrant colours, without anything looking too dull and out of place, the whole setting of Paradise City is diverse yet nothing clashes. All areas of the map, whether it be the Observatory, the Ranch or the City, all of it is visually appealing and designed well with it’s environment which provides a very vivid background to race around.
Strengths
The Marked Man mode adds a nice twist to the game with a mode previously unseen in Burnout. While older games focussed more on traditional races, crash events and road rage events, Burnout Paradise’s Marked Man mode adds an element of survival to the game which makes the races more thrilling and enjoyable to play. The constant threat of the AI vehicles looming around every corner really makes the player think of the best route where they can’t be attacked from a random junction and get eliminated.
Weaknesses
Sometimes, the AI can feel brutal to play against, making the player feel more frustrated and unknowingly take longer routes due to stress and sheer panic of how to get out of the situation they’re in. Additionally, because the mode relies on AI with identical behaviours compared to standard races where some AI are more aggressive than others, it can feel repetitive and formulaic in how the AI play against you.
Games Testing
Performance Testing (Sean)
Performance testing is intended to see how well a game runs under various conditions. This involves checking the frame rate, loading times, memory usage, how the game performs under heavy loads such as lots of enemies being on screen, or having to perform lots of physics calculations at once.
Doing this testing is to ensure that the game stays stable and smooth throughout the playthrough and doesn’t drop frames and ruin the experience. For example, in a bullet-hell game, spawning lots of projectiles and enemies at once, all trying to path-find to the player who could be constantly moving can cause heavy taxation on the games performance.
Usability Testing (Sean)
Usability testing is intended to see how easily players can understand and interact with the game. This means that you typically watch players playing the game and seeing how they navigate the various elements such as menus, objectives, the levels and all the tasks inside of them and seeing whether or not the gameplay and interfaces are intuitive and user-friendly.
Regression Testing (Sean)
Regression testing is intended to make sure anything new added to the game and any fixes don’t accidentally break other things that worked beforehand, such as if two different actors used the same variable, and one changes the value of the variable, it can potentially break the other actor’s logic unintentionally. The easiest way to go about testing this is to just play old parts of the game to make sure everything still works.
Parody Law (Sean)
Parody law allows someone to use part of another person’s work without being considered copyright infringement; this is as long as the work is used to make fun of, comment on, or criticise the original work. A parody usually changes enough of the original work to create something that isn’t clearly trying to replace the original work but instead take its formula and tweak it. However, it must be clear that it is a parody and not a rip-off copy, as well as dodging all the other legal issues like defamation or misleading people to believe it’s related and connected to the original.
For example, a game which successfully parodied another work is The Simpsons: Hit and Run. It parodies open-world games like GTA and uses similar mechanics such as stealing cars, exploring multiple open areas in a singular connected city, and having police chases for causing too much trouble. Compared to GTA, Hit and Run is more tame and comedic, drawing from The Simpsons show itself to mock and humour the genre; since this is a mockery rather than a clone, it falls under fair parody law instead of direct copyright infringement.
Task 2
Programming (Sean)
Hub World - Lobtropolis
The hub world is secondary to the minigame due to how the brief we have been given is. The whole movement and premise of Lobtropolis takes lots of inspiration from the SpongeBob SquarePants games, namely Battle for Bikini Bottom, as well as other games unrelated to SpongeBob from the time.
Movement
The movement of the game should feel smooth to play; not too bouncy and loose but not too rigid and stiff, just that right buttery smooth middle.
Particle Effects
I think whenever Tony jumps, there should be bubbles and sand moving from his feet like dust with low gravity. This should be very easy to do with Niagara.
Dialogue
I have a working dialogue system which allows you to define lines to read, trigger an event, then change the line to play. It is meant to have a photo of the player character in the corner to allow for animations should we want them, but unfortunately SceneCapture2D components are weird.
Moving platforms
I can easily make moving platforms, they can be done through blueprints, or through level sequencing. I plan to do it through blueprints.
Puzzles
Some ideas I’ve thought up are having buttons around the area which unlock doors, having things to collect and bring to people and also having things be locked behind tickets, giving them more than one use. This is all to encourage exploration of the area.
Implementing animation
Adding animations shouldn’t be too bad, since I’m not the one animating because I suck at it. I can easily implement whatever so long as I get given the right files.
Garlic bread/ shop
I have made a shop from a past project, I can use a similar system using enumerators and structs to create a working modular shop system component, attachable to any actor. It’s overkill, but it’s good practice.
Minigame - Lots Of Bullets (LOB)
This minigame is a bullet hell shooter in the vain of Brotato, 20 Minutes Until Dawn, and Vampire Survivors. The premise is that you survive for 5 minutes without dying, with an upgrade unlocking every 30 seconds which you claim from a central pedestal by walking through it. This has obviously been iterated on numerous times, originally being infinite and you unlock upgrades through levelling, but we felt this was too generic.
Movement
The player movement is supposed to feel fluid and nice to play with. I feel like I have the movement down perfectly with it how it is which was very simple to implement and test out for final development
Camera
The camera angle we have opted for isn’t a traditional directly top down angle, but rather 60 to 70 degrees as this allows us to use 3D assets opposed to 2D ones when making the levels, and allows for greater creativity with the levels and plays to everyone’s strengths.
Enemy Movement
The movement for the enemies should feel very fluid, like they’re getting to you slow enough to not be 28 Days Later style swarmed and killed instantly, but fast enough to where some skill is required. There are two methods of movement I can think of.
AI MoveTo
This node uses actual pathfinding, and requires a nav mesh bound volume in order to path properly and accurately to the players location. The downside of this is that it is relatively expensive to calculate movement for at least 100 enemies on screen at once.
Getting the location and doing a world offset in the direction
The cheaper but more bespoke solution is to get the players current location, check to see if they’re within a certain distance of the enemy to activate them, then add an offset in the direction of the player. The downside on this which I found while testing if it’s viable is that it completely ignores collision on enemies, causing them to clump up and cause gameplay issues.
It also removes all options of verticality due to the AI cheating and just flying to the location rather than sticking to the floor, which we originally planned but changed last minute to fit this limitation. If time permits it, I may look into seeing if I can do a ray cast downwards and make the AI stick to the floor, or in a certain distance to it, and if it doesn’t hit the requirements, it reroutes and goes a different way.
Weapon upgrades
We have toyed with the idea of having various weapon upgrades such as fire rate, reload speed and ammo count changes. This gives the player an advantage and makes things interesting. This also allows us to ramp up the difficulty roughly once a minute, which I touched on further down in the Timer section.
Player upgrades
Some of the upgrades we could grant the player involve walk speed, health increases, and invincibility frames. We also thought about maybes adding a jump mechanic, but with the limit of no verticality in the world offset method of movement, it wouldn’t be worth the thought.
Timer
The total timer for this game would be 5 minutes with the option of an endless mode, which is accessible from the games main menu, or from the arcade machine in the hub world. The timer would increase and every 30 seconds, it would offer an upgrade token, spendable on either a weapon or player upgrade. This also increases the difficulty, raising the max enemy limit and increasing spawn rates.
Ticket/ win conditions
Currently, I have two options for how to do tickets. Either do a) 1 point per enemy killed, 1 ticket per 25 or 100 points, its would take a lot longer to get the required tickets to get out, meaning it encourages lots of playing or exploring in the hub world, but can also turn people away due to not liking the game potentially. Alternatively, b) would be to do 80-120 points on a random float in that range, and award 1 ticket for every 2000 points. Statistically*, seeing the bigger number makes people think they’re doing better, so it could help with the dislike towards the game.
/* see table below
| Source | Relevance | |
|---|---|---|
| Gamification | Gamification is the application of typical elements of gameplaying such as point scoring, rules of play, and competition with others to areas of activity, typically as an online marketing technique to encourage engagement with a product or service - “Gamification is exciting because it promises to make the hard stuff in life fun” ^ Oxford Dictionaries definition of gamification | |
| Positive Reinforcement | Oftentimes, seeing a result quickly from minimal effort is very refreshing and nice to see, so seeing a number in the 4 digits after killing 10 enemies can feel very nice. | |
| Framing | Depending how you frame something, it can mean different things, such as optimists seeing a glass half full where a pessimist will see it half empty. Seeing a number go high from the same amount of effort as the other method will help drive people to play more. |
Coding (Sean)
Movement
When creating a game, one of the key things is being able to move. If you cannot move, you have a very limited game. Movement in both 2D and 3D space is usually something very easy to implement, you just get the current location and add to it every frame that a movement key is held down.
Movement is usually one of the first, if not the first thing that I add into a game, since it’s the key fundamental of a game. Movement is also one of the hardest things to get right. In a 3D platformer, you want the player to slow down when there’s no input, to the point where they practically lock up mid air and fall where the player stopped giving input, whereas in literally any other game, you would want the player to carry that momentum so you have more accurate jumps.
If we end up doing any form of 3D platforming in our work, I would likely employ that method of stopping forward movement mid air.
Commonly Used Mechanics
Many games share the same base mechanics, usually with their own spin on it, for example reloading in Helldivers 2 compared to reloading in Call of Duty. In Helldivers, when you reload with a half full magazine, you bin the rest of the ammo in that magazine. In Call of Duty, you keep that extra ammo, and it only refills what’s missing of a full magazine.
Another example would be sprinting. Some games like Call of Duty: Warzone, which has a walk, a run, and a tactical sprint. This means you have 3 speeds to get about the map. Compare this to a game like Mirror’s Edge, which has 2 methods, a walk and a sprint, but also designed to help you get around the map at different paces.
Each mechanic is used differently depending on the scenario, the developer and the designer. I believe I will end up implementing common mechanics with my own twist somehow in our game.
Commenting code
Commenting code is a very good practice. It helps improve readability and helps you to find parts of the code quicker compared to without the comments. In addition, it also helps with collaboration. If you wrote something bespoke, and you understand how it works, that’s great, but if you try to show someone else on the team the same code without you being there to explain it, it leads to confusion and takes more time to understand and comprehend the code written.
Optimisation
Optimisation, at least in Unreal Engine, is something that is relative easy to do. Usually it comes in the form of reducing unnecessary calls, and using event-driven logic rather than running things on the game tick.
It could also come in the form of turning off various settings that don’t do anything or aren’t being used. Some things are turned on by default and add unnecessary bloat to a project, for example, Dell’s OpenImage Denoise very rarely is used for games, and is more used for video and movie production since Unreal Engine is multi-purpose, but having this on adds 50mb to the final packaged build, which doesn’t sound like lots but depending on the game, it can reduce the size by a lot.
Visual Scripting vs Traditional Programming in Unreal Engine 5
Visual Scripting is oftentimes very powerful for prototyping and is very easy to learn with compared to traditional programming since you don’t have to write anything, you just drag and drop basically. You don’t need to worry about syntax errors or anything like that, you just need to pass the right type of object to the node and you’re golden.
Traditional Programming is more commonly used for things that would be a pain to do in Blueprints/Visual Scripting, and is more used in general as people know C++. A lot of companies would want you to know both and use both, some would prefer just C++, some prefer just blueprints.
Scope Creep
Scope Creep is a side effect of not having a scope. This is where you have an idea, and think of lots of things you can do with it without actually having anything made. For example, we had the idea for a wave based shooter, and we had the ideas of having multiple enemy types, weapon types, ammo types, perks, ways to regain ammo, consumables, all of this conceptual stuff without the foundation and groundwork to actually make it.
The only way to combat scope creep is by having the self control to not think ambitiously past the scope, instead working up to the scope, then expanding it from there.
Task 4 - The Build
Baseline
The baseline of the game was to have a hub world, and a minigame. The minigame must impact the hub world in some way.
The way we went about this was by having a 3D platforming hub world, which has coins, and a bullet hell minigame. You score points in the bullet hell, which converts to an amount of coins; every 1000 score is 1 coin. We originally had it at 2000 but this felt too much.
The Making
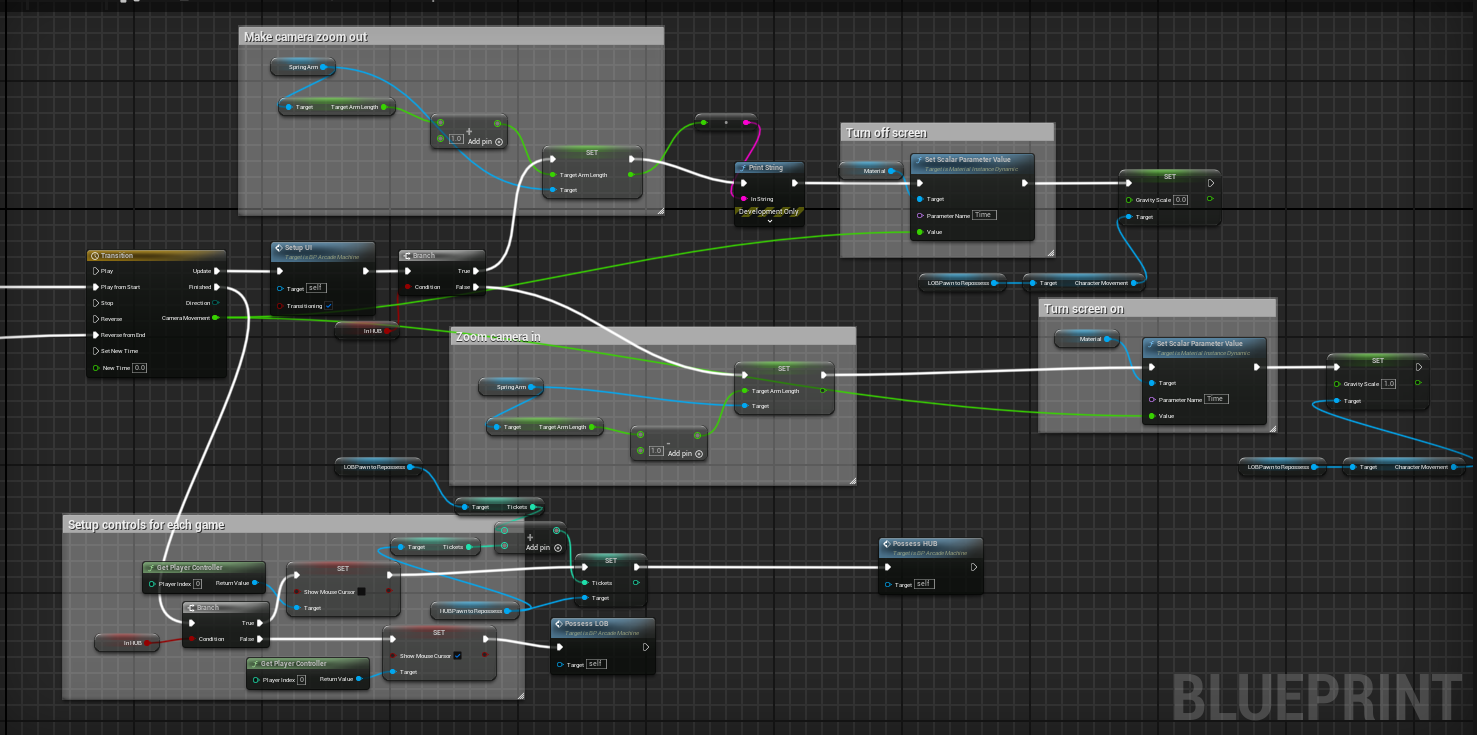
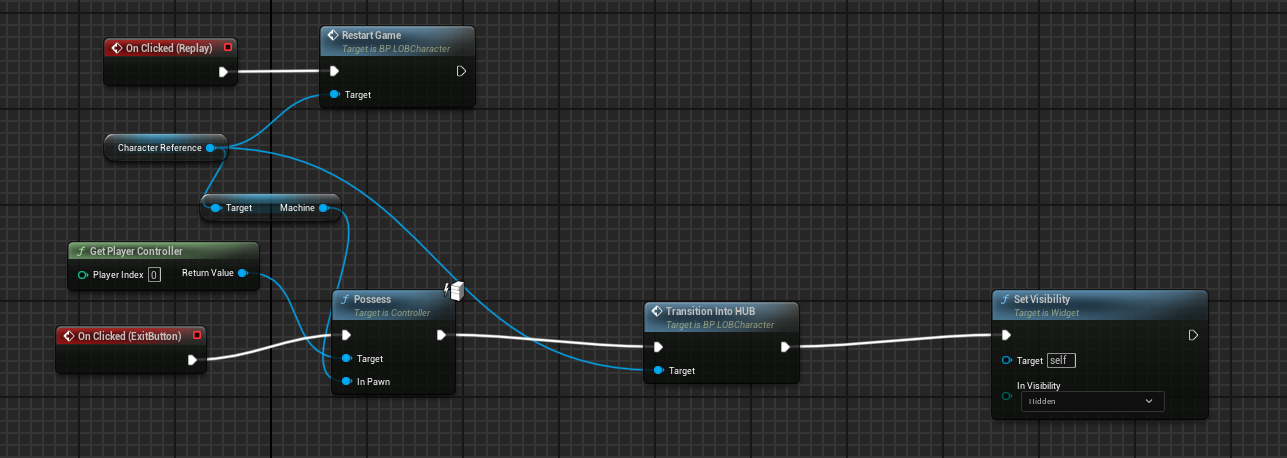
Transition
The first thing I did was make the transition between two actors.
I started with two different actors, BP_HUBCharacter and BP_LOBCharacter for the hub and minigame respectively. I used experience from my previous works and created a third actor, BP_ArcadeMachine, which you can possess from either character and it transitions into the other.
This took me a few hours to get right, but eventually I got it how I liked it.
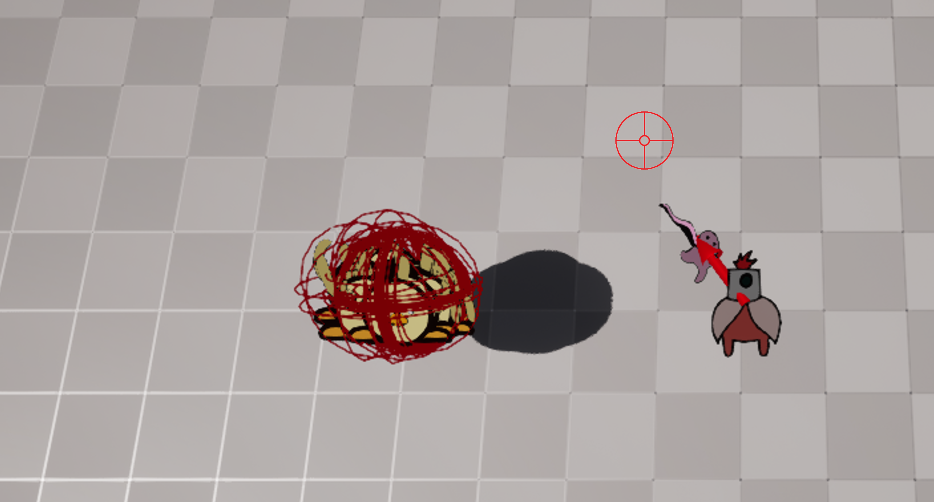
Bullet Hell Game / LOBCharacter
The bullet hell game is supposed to be the main focus of the assignment.
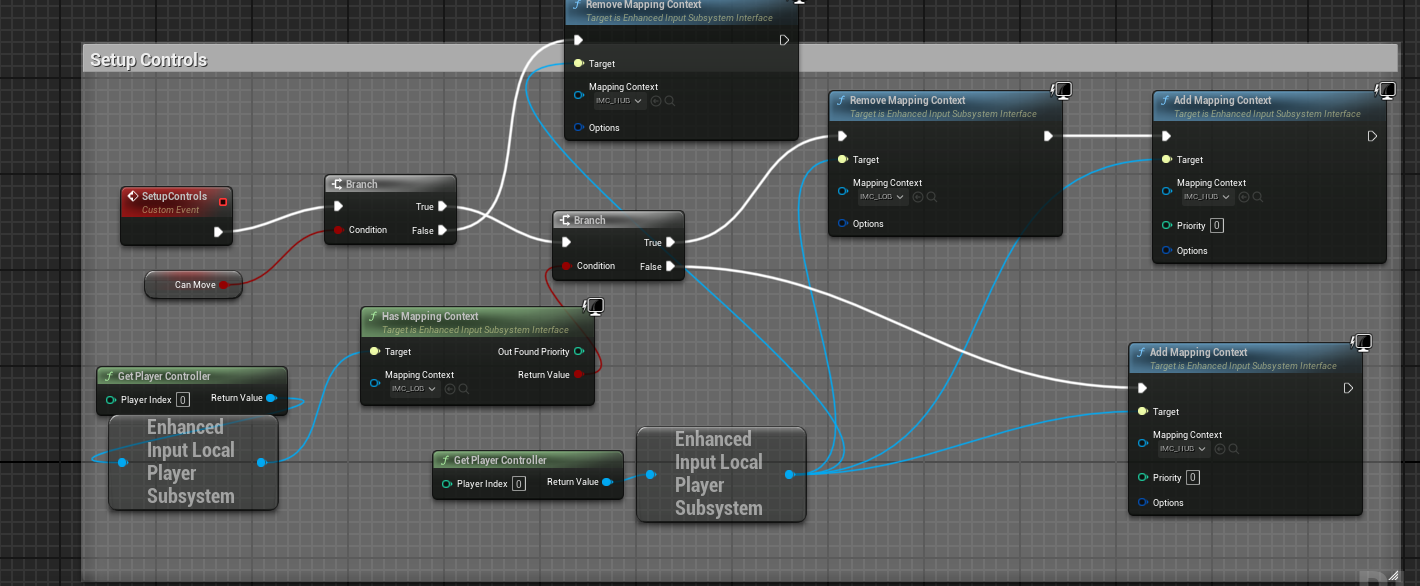
The first thing I did was setting up input controls.
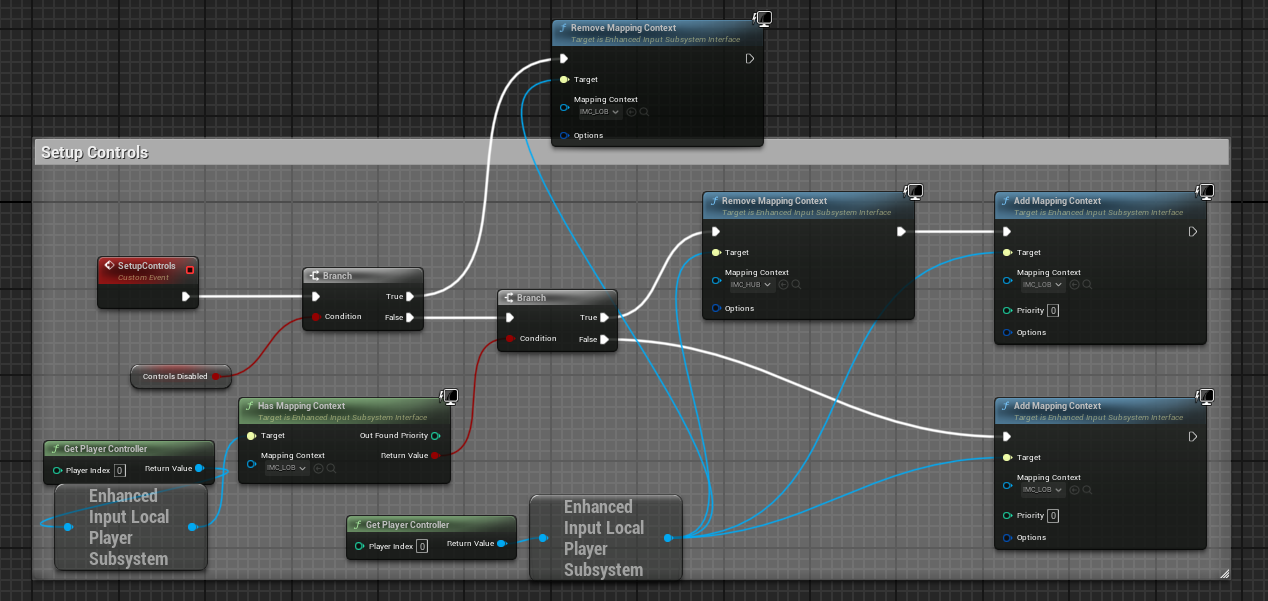
I have the Controls Disabled check since we don’t want the player to receive input while not possessed.
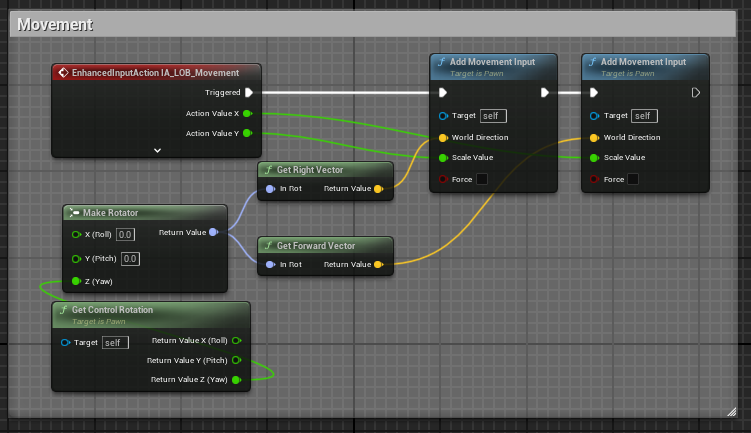
I then started on the movement which ended up very simple, like this.
I then started on the weapon. I made a function simply called FireWeapon.
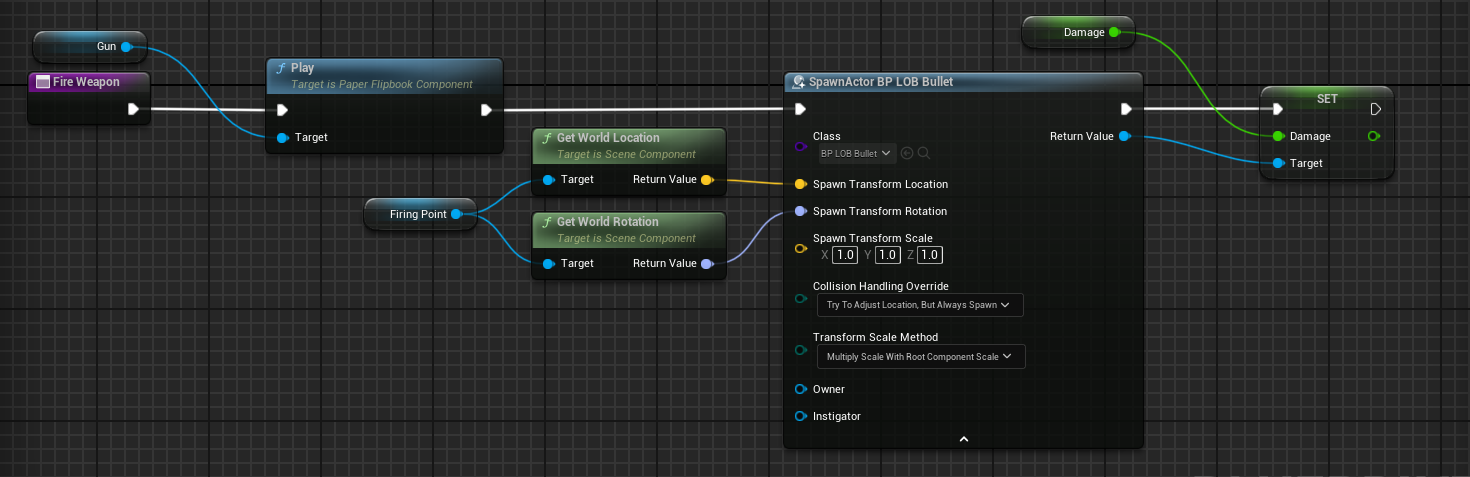
Very simple, just spawns the bullet actor at the firing point scene in the player blueprint, then sets the requested damage to the bullet on spawn.
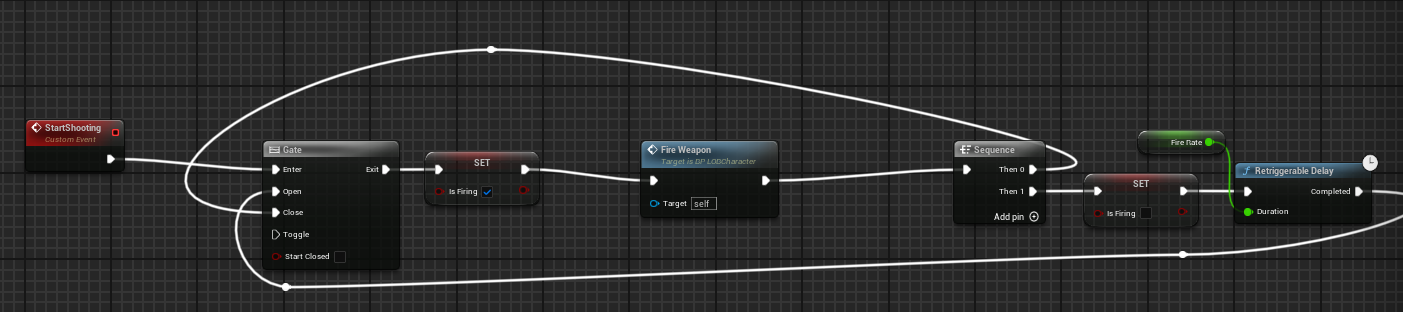
I then tied it to this event so I can have a pause between shots, which is dictated by the Fire Rate variable.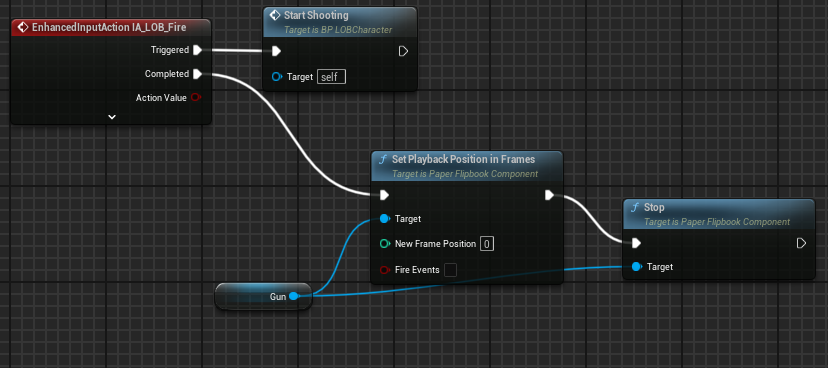
That function is called on the fire input action, set to left click.
After I had firing working, I then needed to find a way to fire to the mouse cursor. I did this by having an arrow, and rotating to the direction that points.
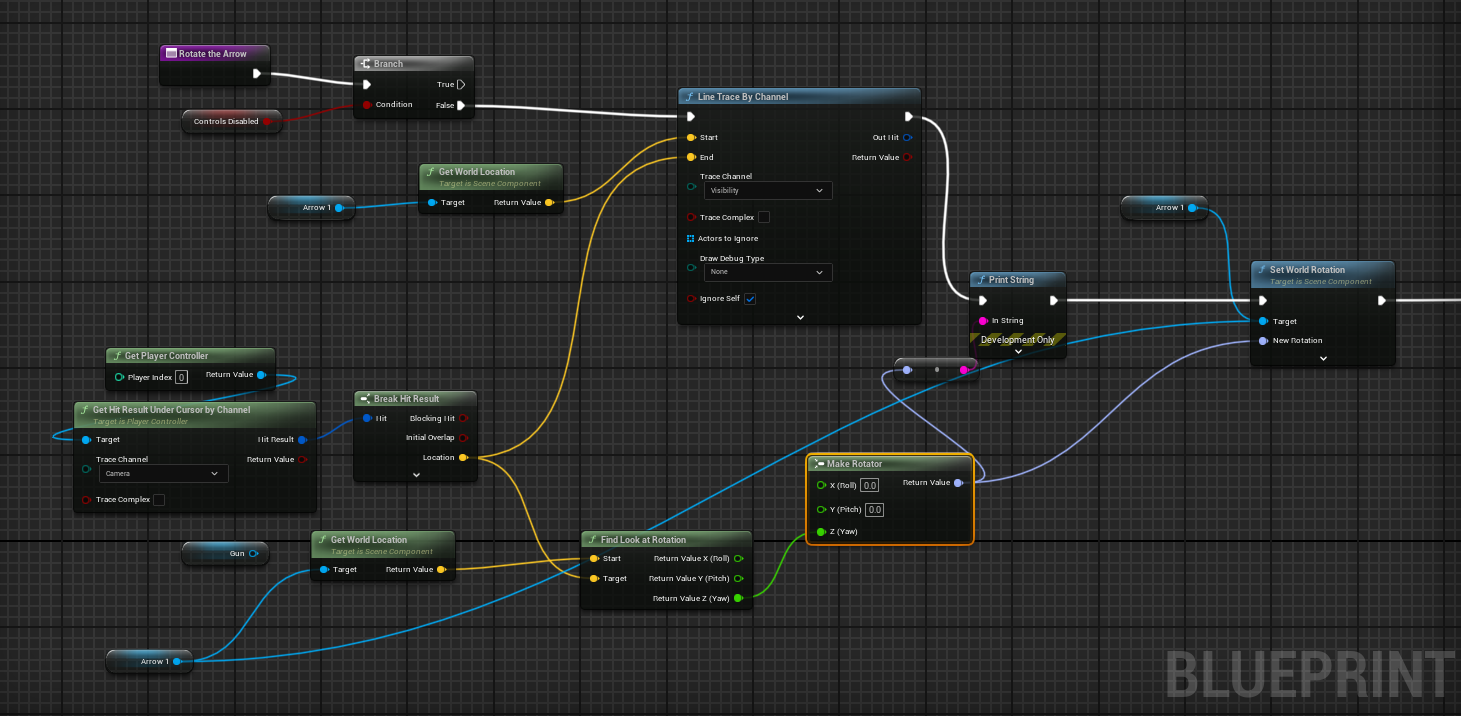
This performs a line trace from the player up to the cursor point, and rotates the arrow accordingly.
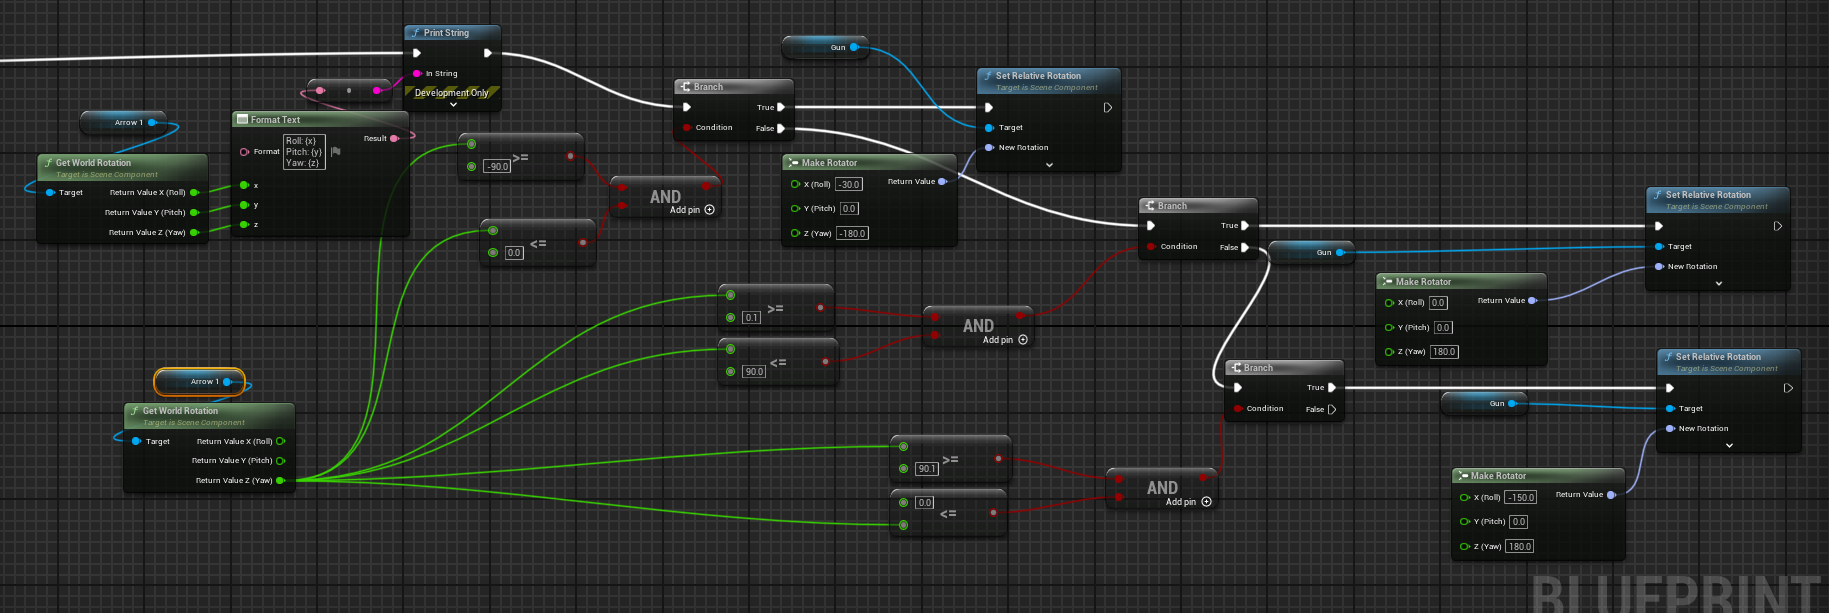
This is the final version I have of how to rotate the weapon and I still didn’t get it right, because it still rotates weirdly along the axis.
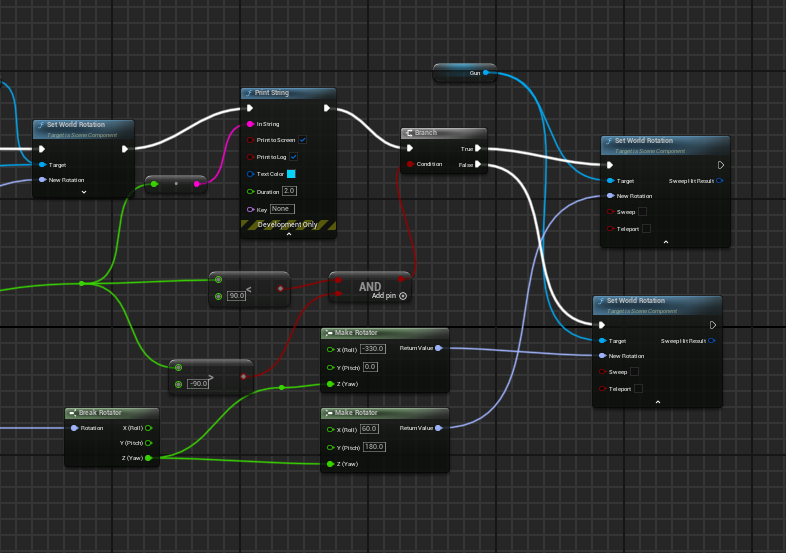
This was an older attempt doing basically the same thing, but ultimately it didn’t work as intended. The weapon itself still shoots to where I need it to, so that’s the main important thing.
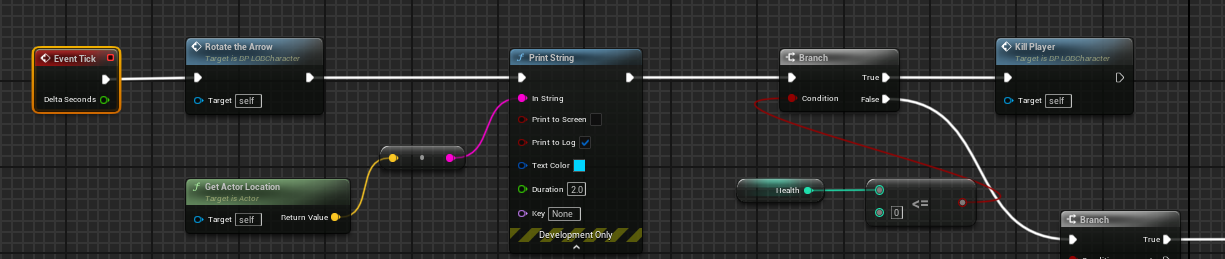
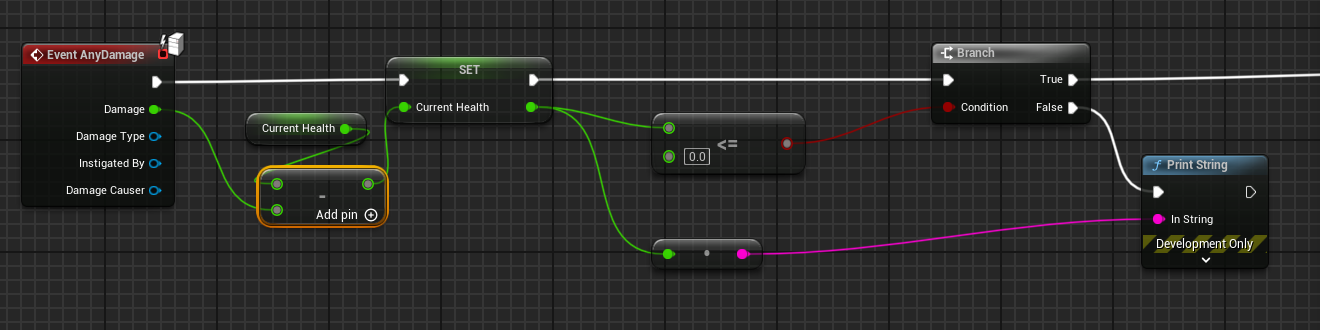
After calling that on tick, I started working on the basics of health. I made it so that if the health is ⇐ 0 on any given tick, it kills the player.
Chase AI and Spawner
Originally, we were going to go with the bespoke method mentioned in task 2:
“
AI MoveTo
This node uses actual pathfinding, and requires a nav mesh bound volume in order to path properly and accurately to the players location. The downside of this is that it is relatively expensive to calculate movement for at least 100 enemies on screen at once.
”
Getting the location and doing a world offset in the direction
The cheaper but more bespoke solution is to get the players current location, check to see if they’re within a certain distance of the enemy to activate them, then add an offset in the direction of the player. The downside on this which I found while testing if it’s viable is that it completely ignores collision on enemies, causing them to clump up and cause gameplay issues.
We originally did the offset, but the collision was very buggy and enemies often overlapped a lot, especially if you ran loops around them.
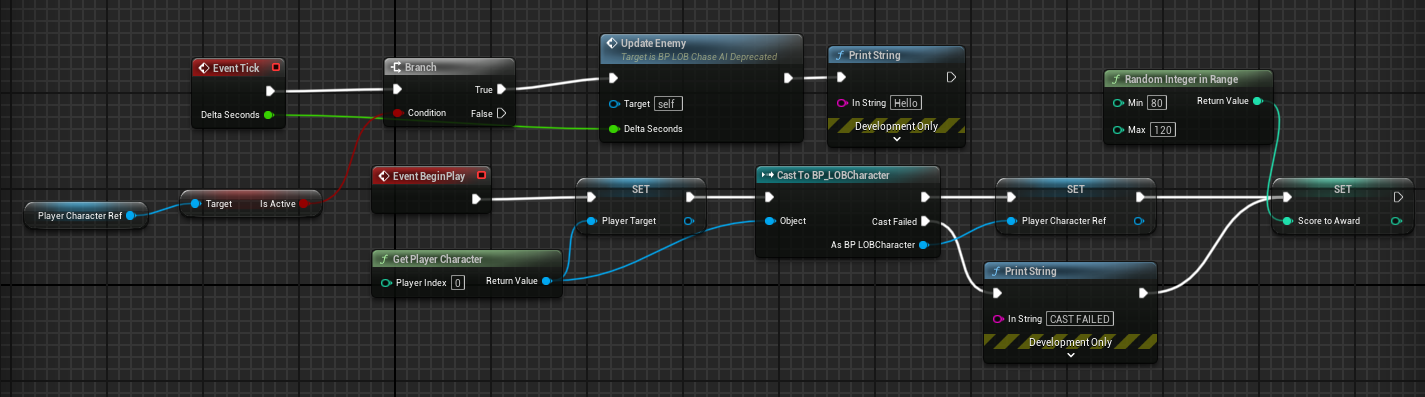
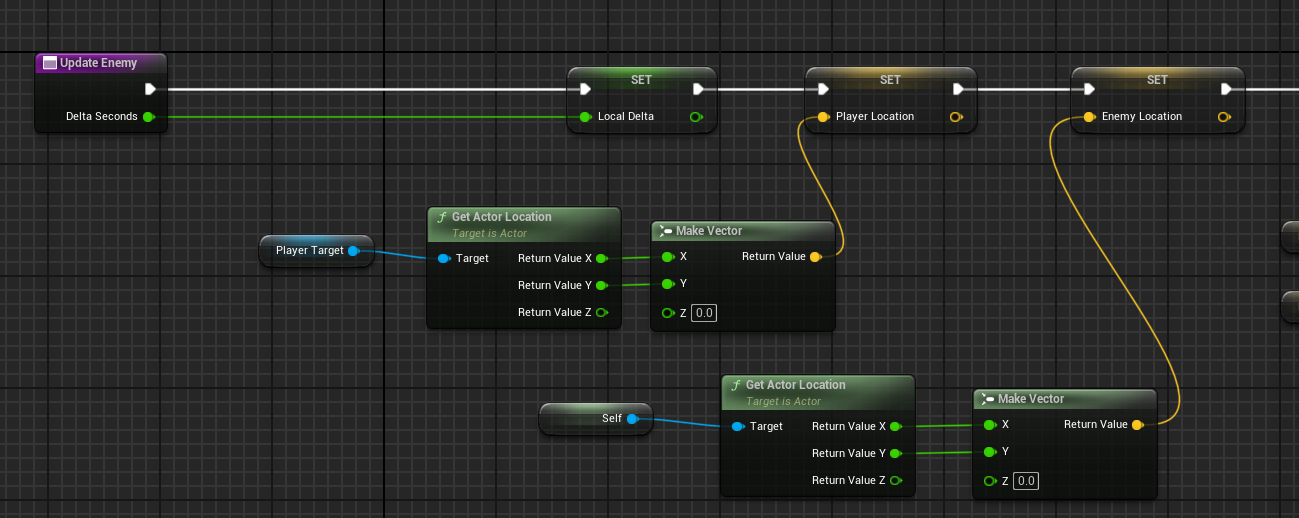
It starts by getting the players location, and the current location.
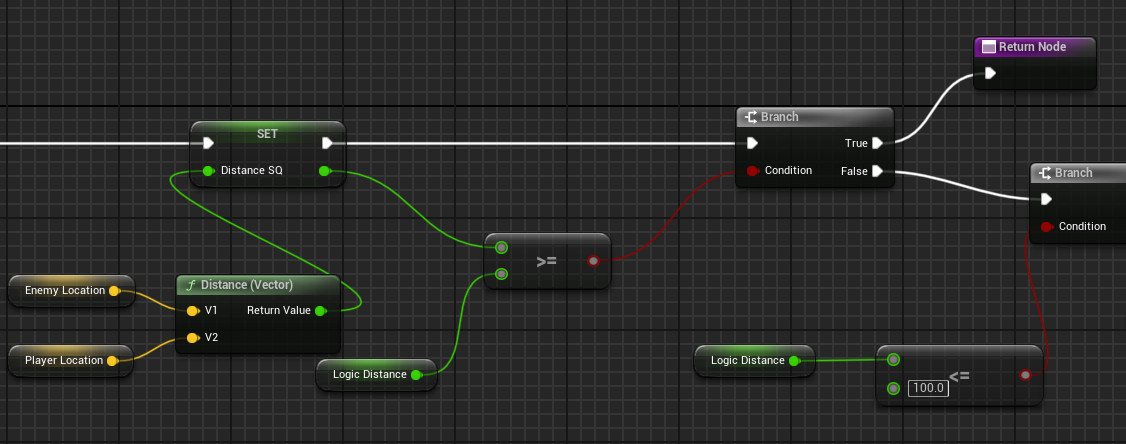
It then compares them, and checks to see if the player is within range.
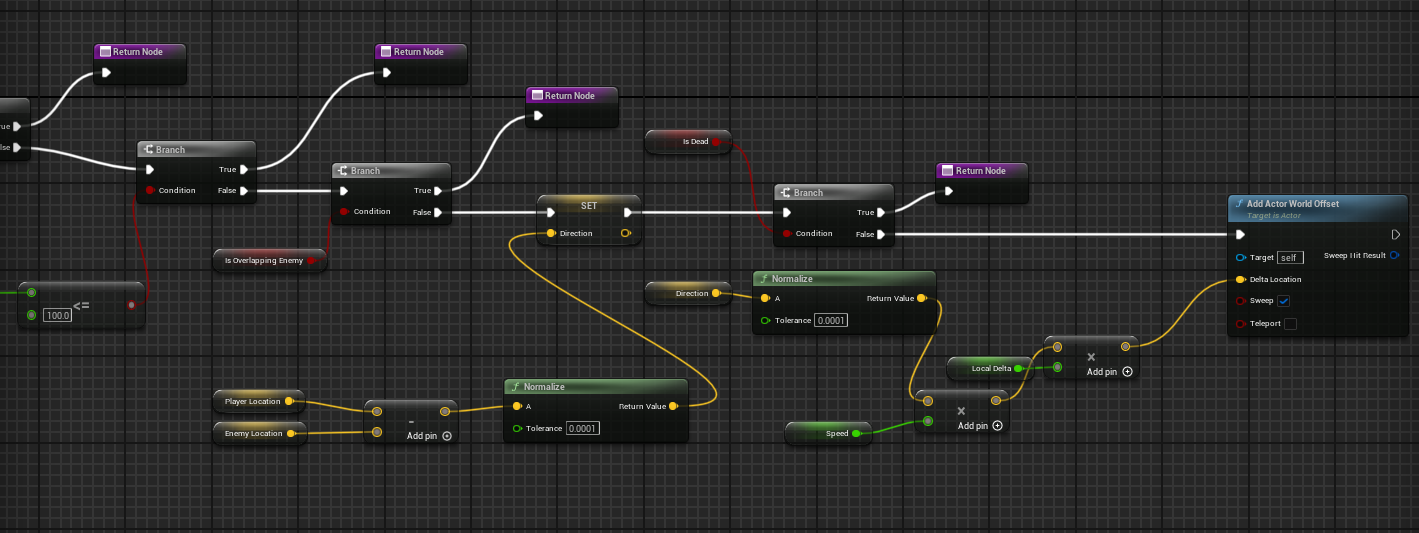
It’s then meant to check if it’s overlapping an enemy but that didn’t work, so it always went on to get the direction and add a world offset.
This worked, but barely, and wasn’t fun to play against. So I ended up making a new blueprint and worked on using AI MoveTo instead
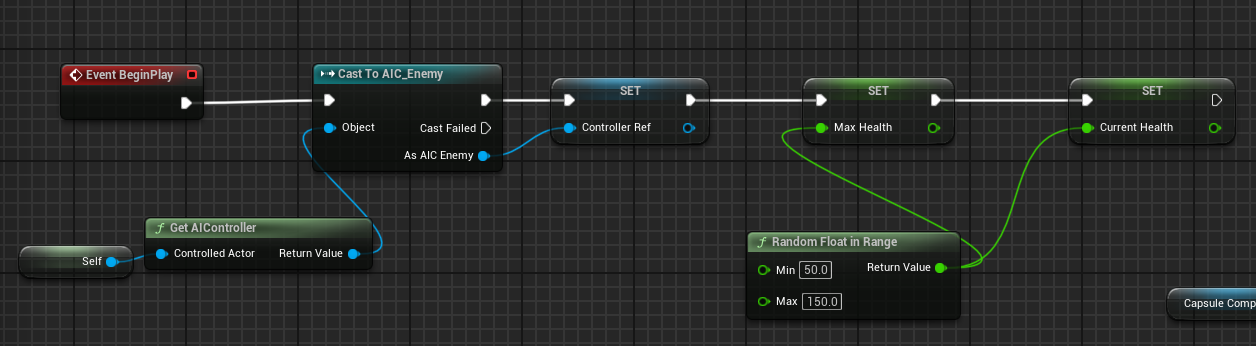
This time, I used an AI Controller instead of putting it all into one blueprint.
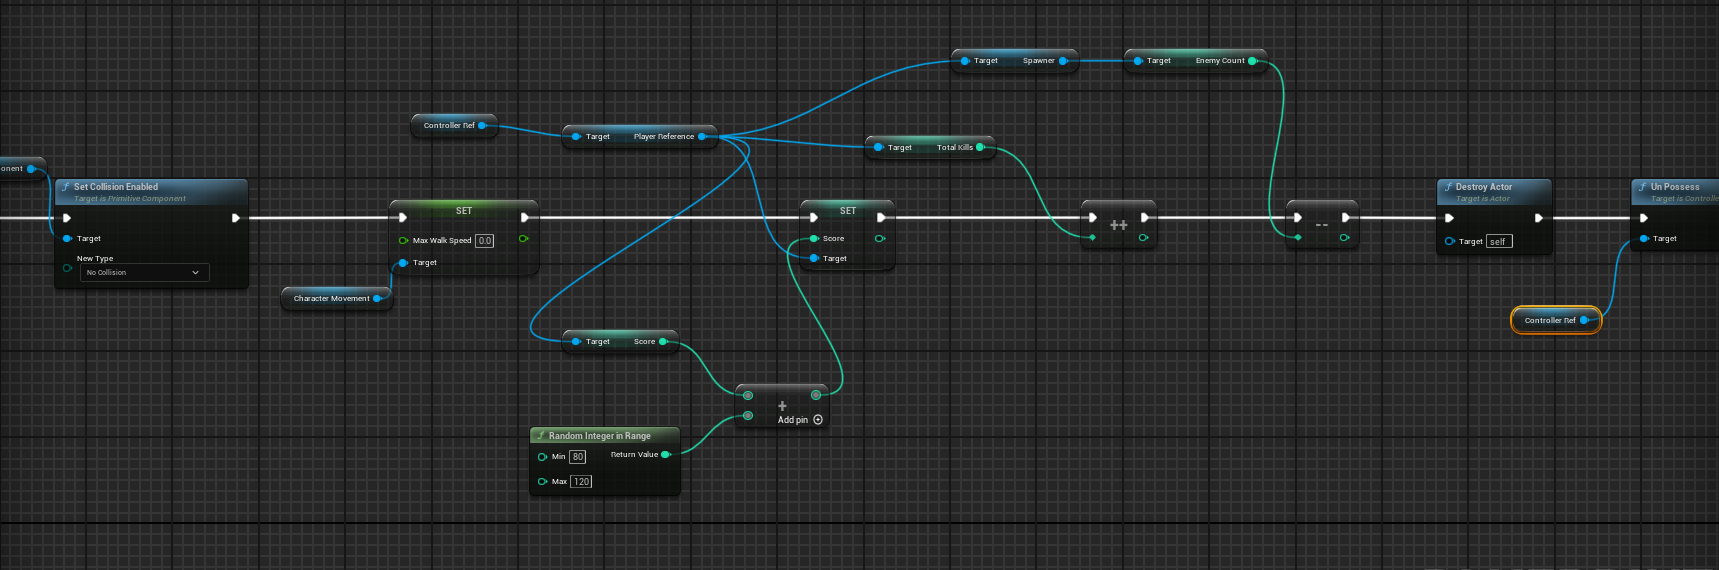
I set the collision to off, walk speed to 0 to stop movement, and then added the appropriate score, incremented the kill count, and decremented the enemy count since it was dead.

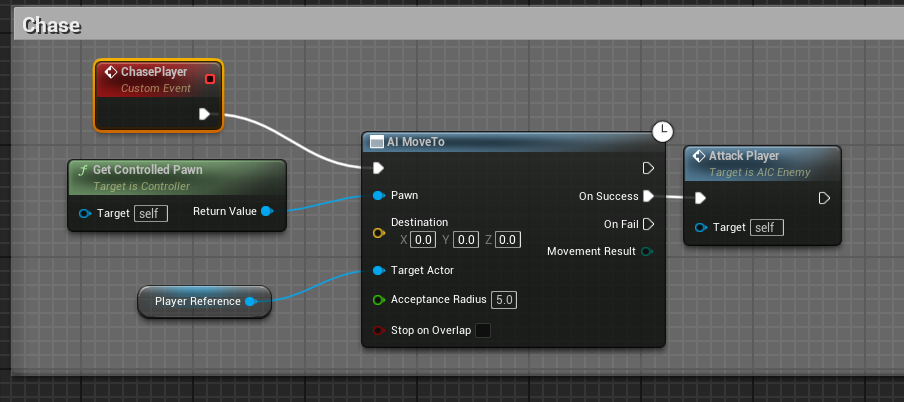
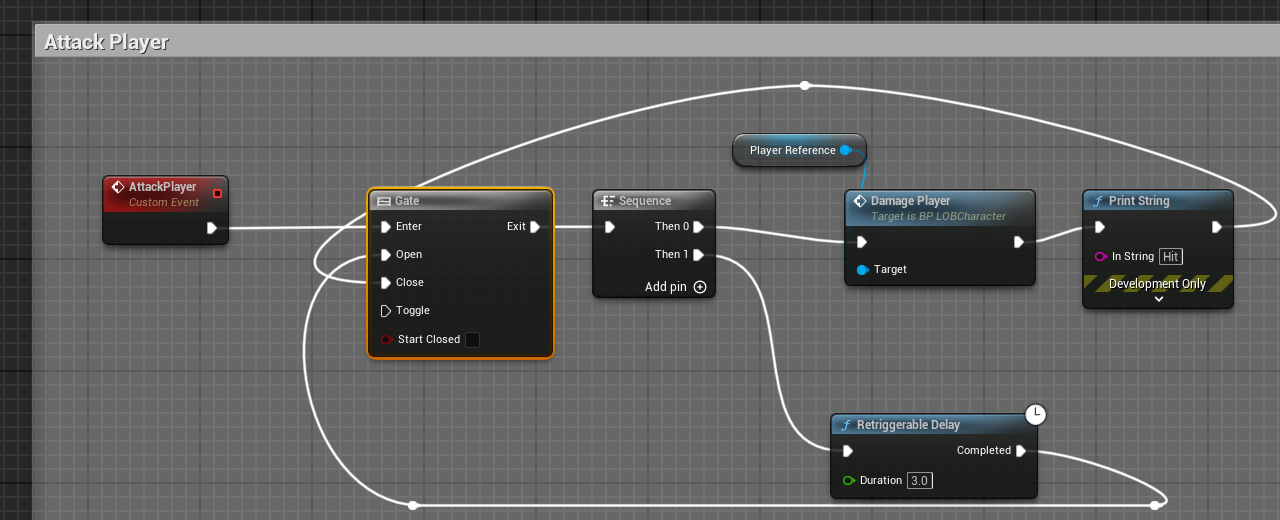

This is all in the AI Controller. It moves the enemy towards the player using the AI MoveTo, then when it’s in the acceptance radius, it attacks the player.
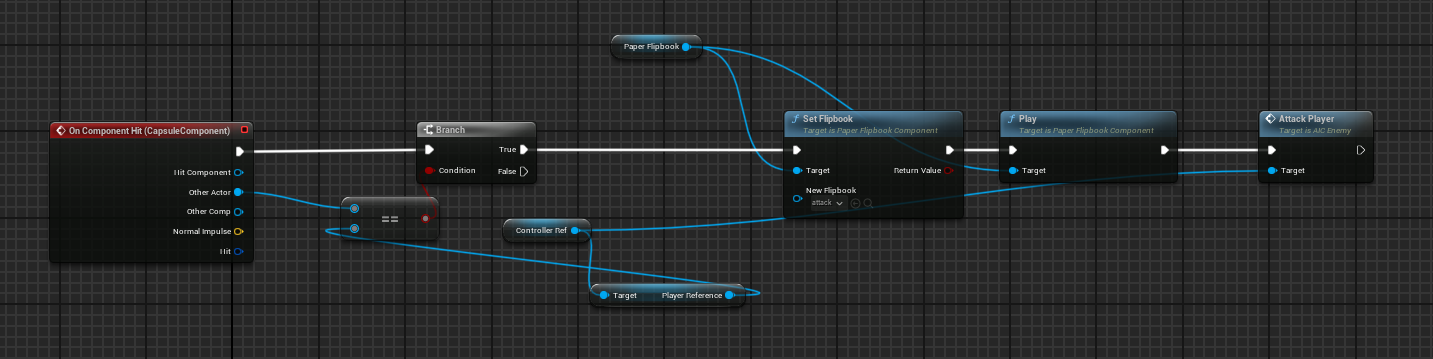
Incase that didn’t fire properly, I also added the attack to the hit event on the capsule, as well as playing the animation to attack.
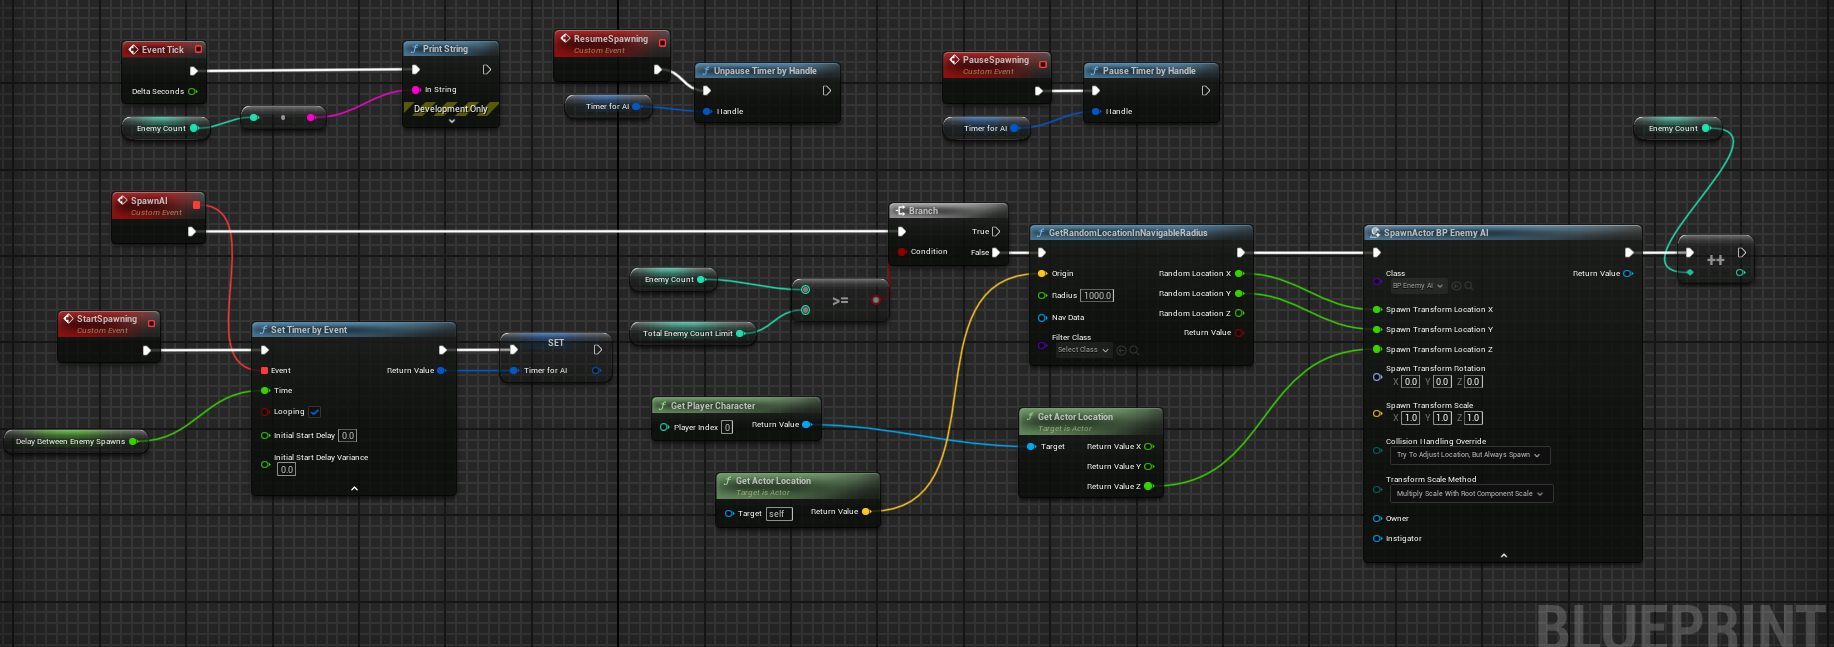
This is the spawner blueprint. It spawns an enemy in a reachable location, but uses the Z axis of the player to keep them spawning at a height where they can interact with eachother.
At some point, me and Thomas merged our projects, but in doing so, I unknowningly had two copies of the enemy blueprint since I sent some over to him to better design the level around. This created the biggest headache, since all the spawners and everything referencing the enemy, they all referenced the old blueprint, not the new one, meaning any changes I made didn’t apply, and when I tried to kill all the actors, it simply didn’t.
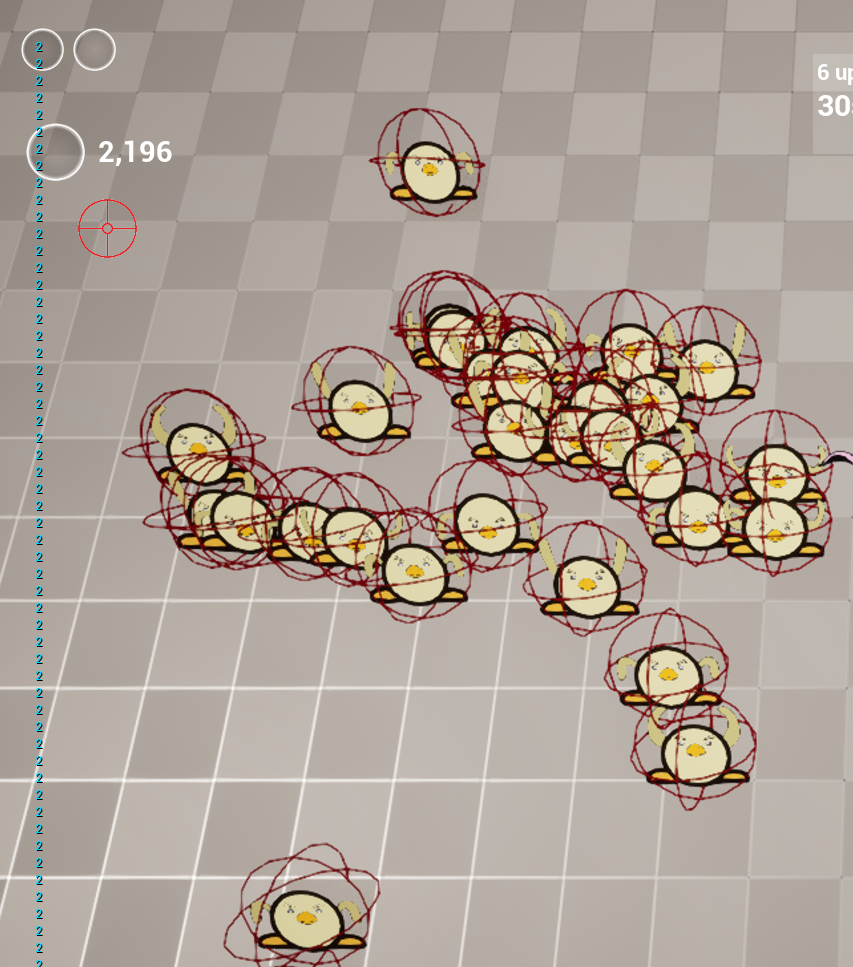
UI
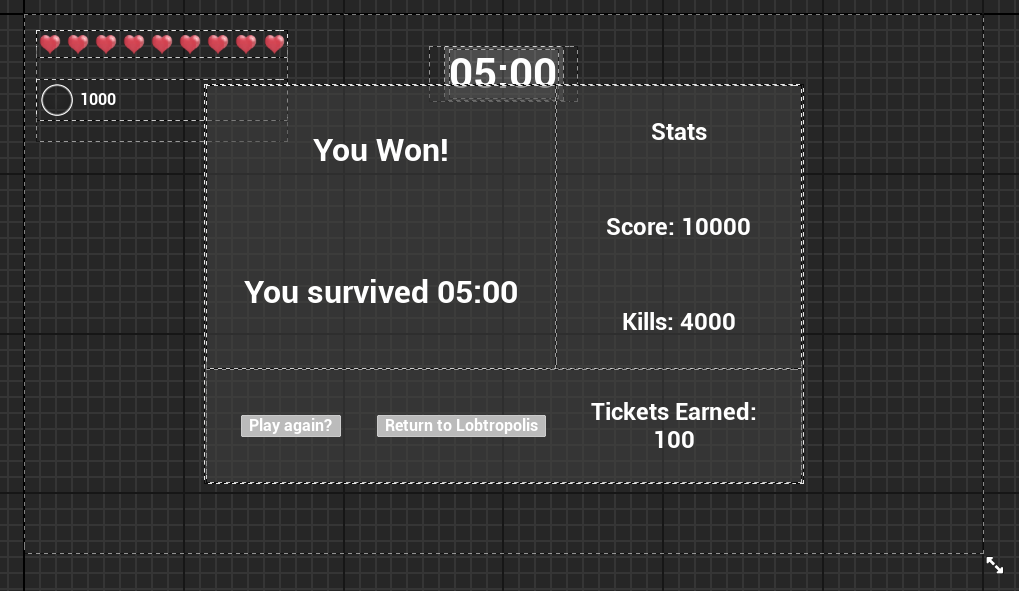
This was the final UI we landed on. Each part is toggled on individually.

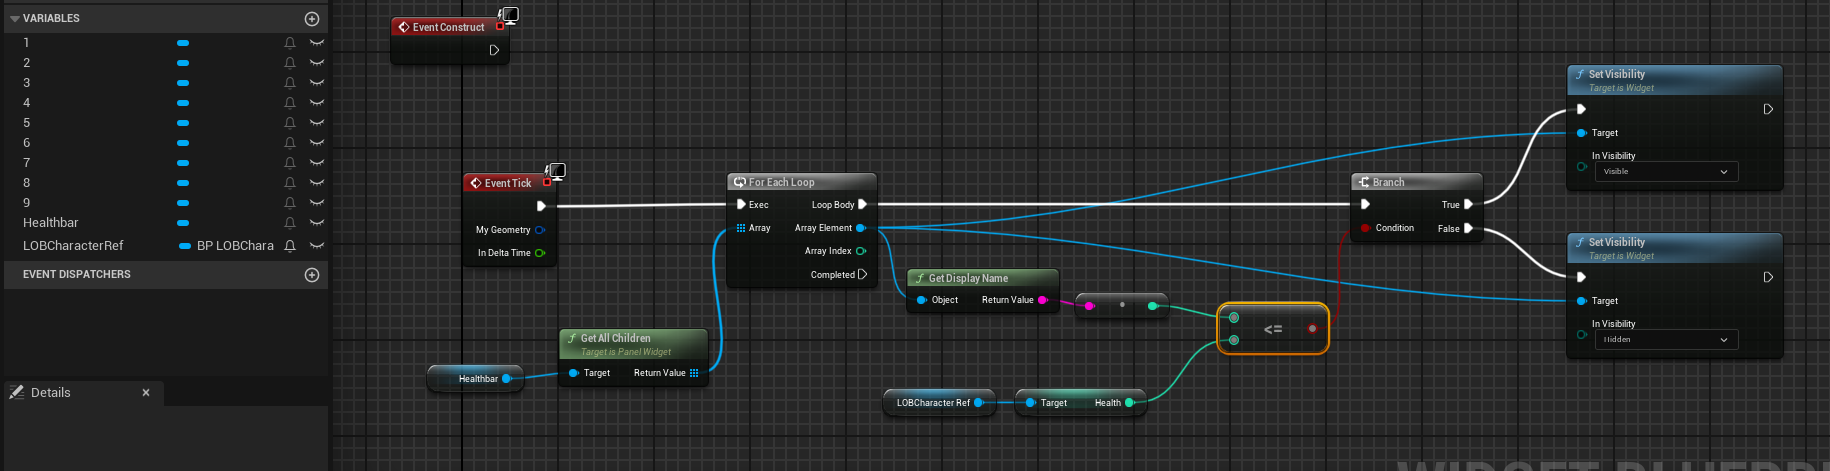
The health works by getting the name of each number, and disabling ones that are less than or equal to the health variable, meaning if I want to give more health, I just increase the health variable and it automatically adjusts.
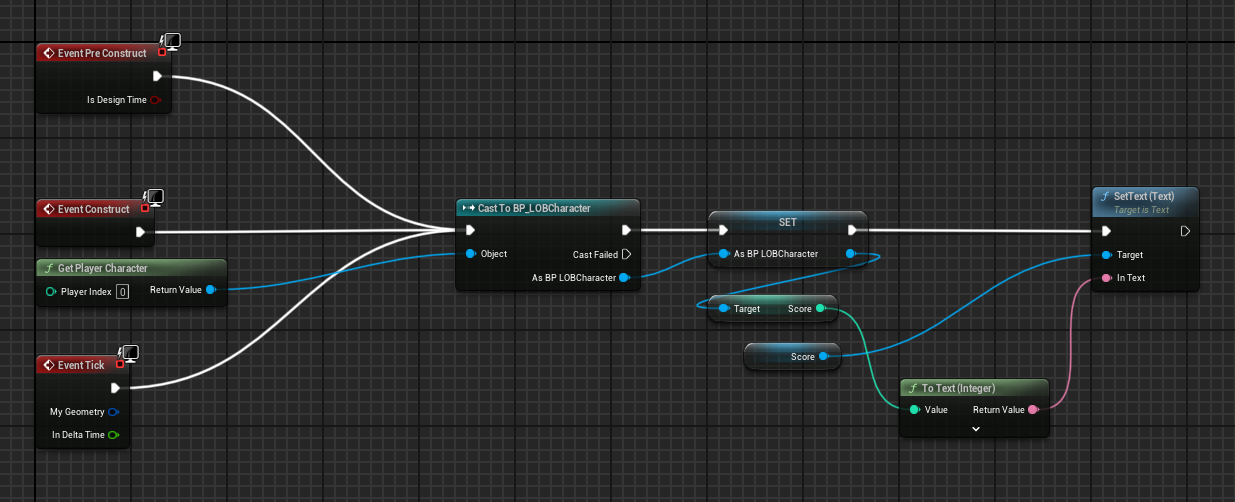
The score just checks for the players score value every tick. I had this without the tick, but it kept constructing and setting the value to be the arcade machine, not the LOB character, meaning it kept breaking.
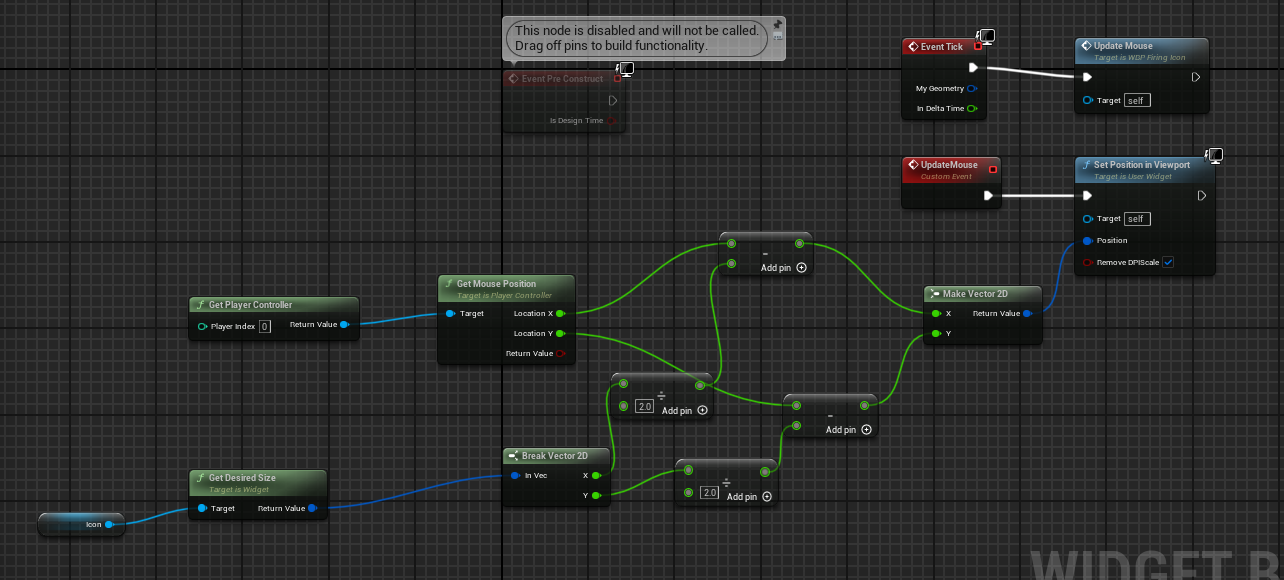
The firing icon follows the mouse around to indicate where to shoot.
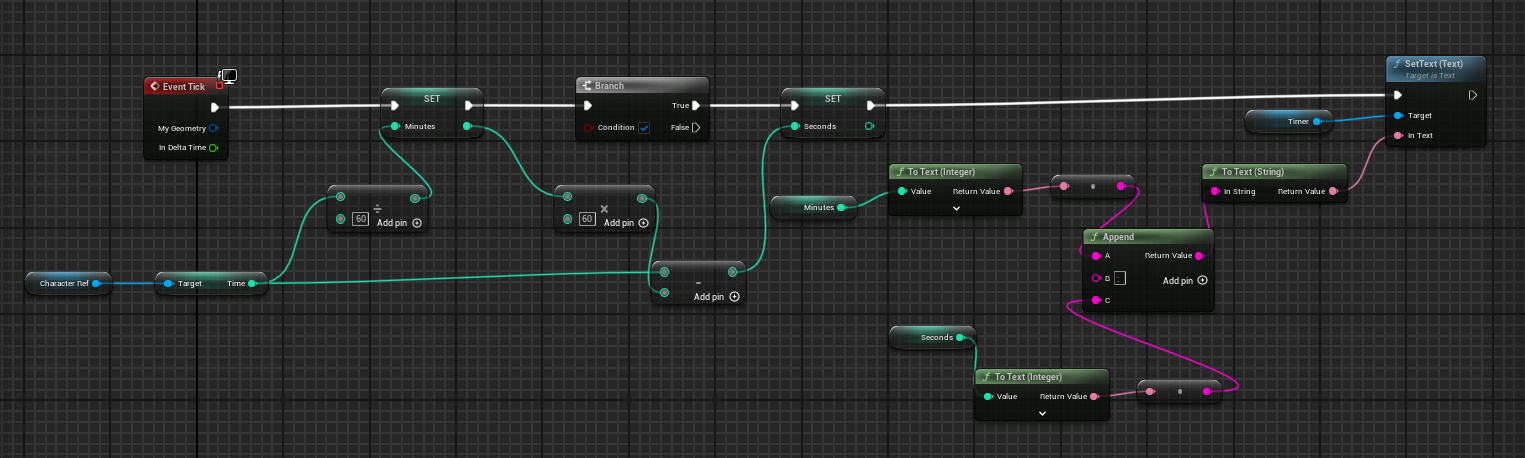
The timer looks like this, it just checks the time and splits it to minutes and seconds.
The game over screen is also very simple, it just has two buttons, the rest of the score stuff is set by bindings just fetching the values from the character reference.
3D Platformer / HUBCharacter
3D platforming is something that sounds easy from an outside perspective, but getting the character to feel right when playing is something that is hard to do.
Movement
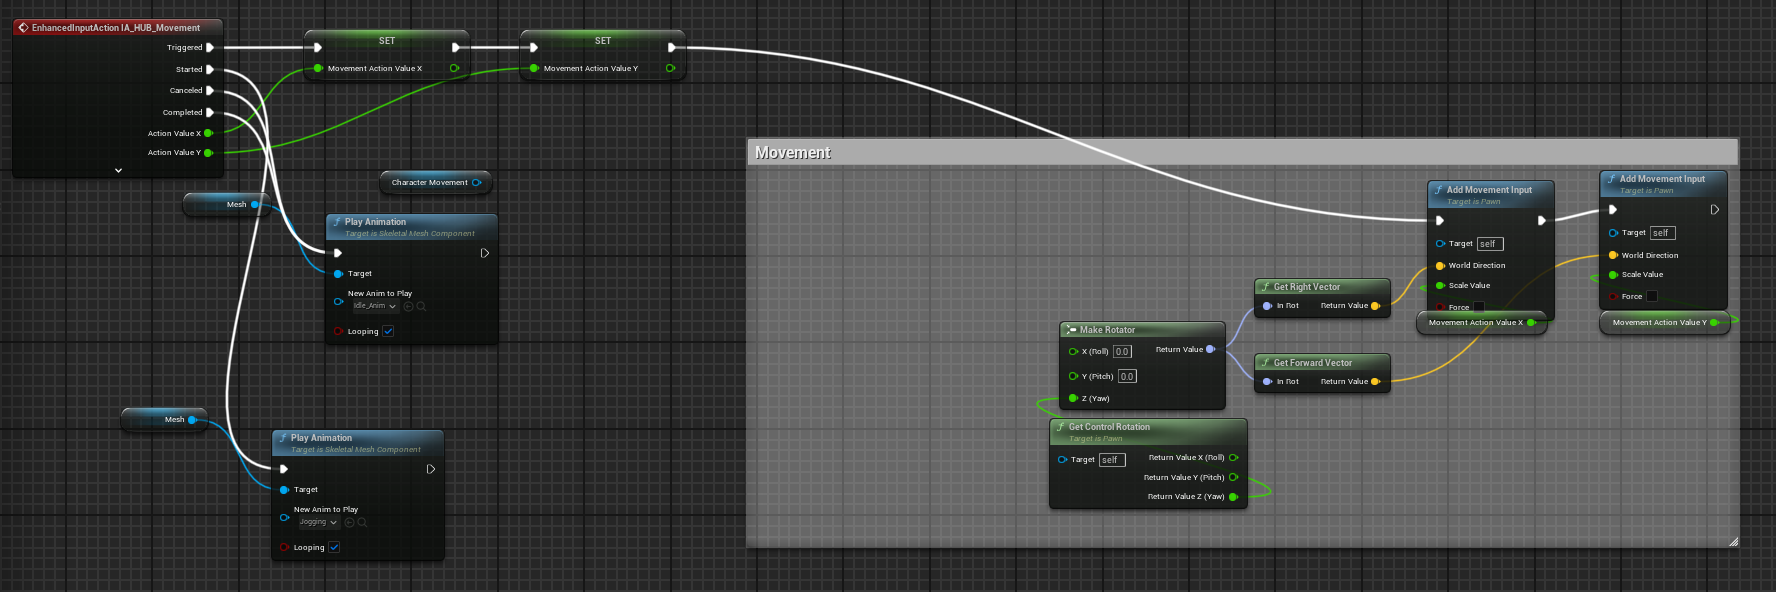
Movement was something I wanted to get right. By default, the UE5 movement felt too floaty and not appropriate for a 3D platformer. To fix this, I wanted to start by making the character rotate to face the direction they were moving but without rotating the camera. I first tried this by adding yaw to the controller, but this didn’t work how I intended. At one point, the character just spun.
As funny as it was, it wasn’t what I wanted. I then tried to set it based on held keys.
This whole mess of nodes is what I ended up with, but this didn’t work how I wanted, it felt too snappy, too robotic and unnatural. I then found out that I wasted like 3 hours of my time doing various things to fix it when all I had to do was enable OrientRotationToMovement in the character movement component.

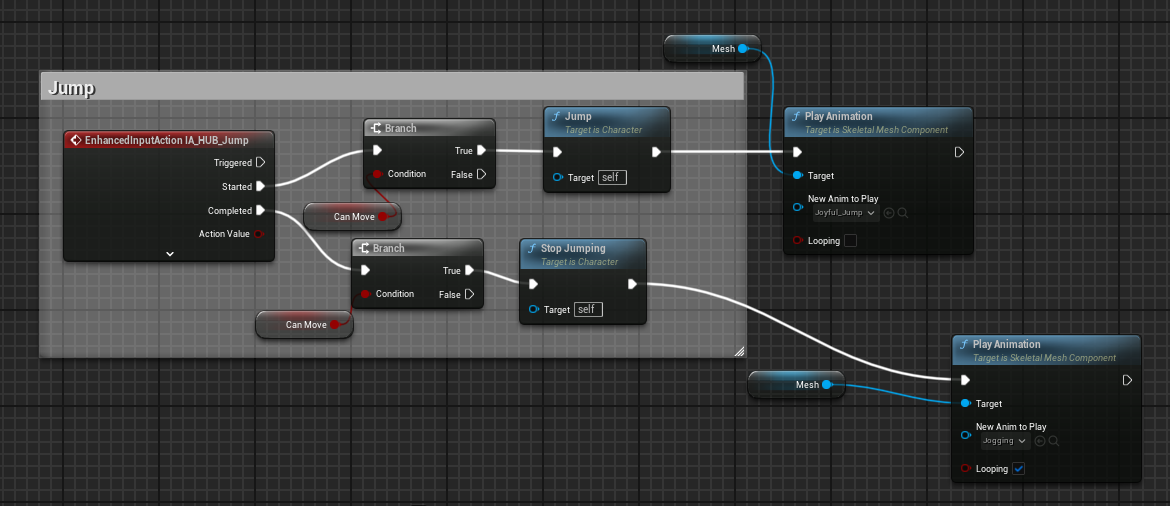
Jumping
The jump is simple, it’s built into UE5, but I had to tweak the settings to make it less floaty and to make it carry less momentum when there is no input.
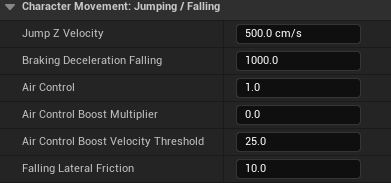
Setting the Braking Deceleration Falling value that high meant that the player stopped almost immediately after there is no input.
Interacting
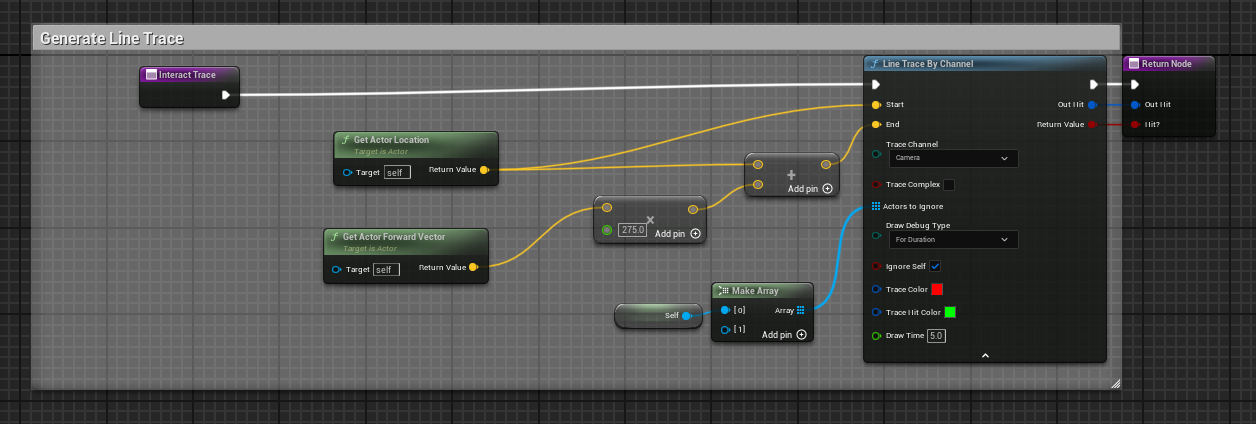
This generates a line trace.
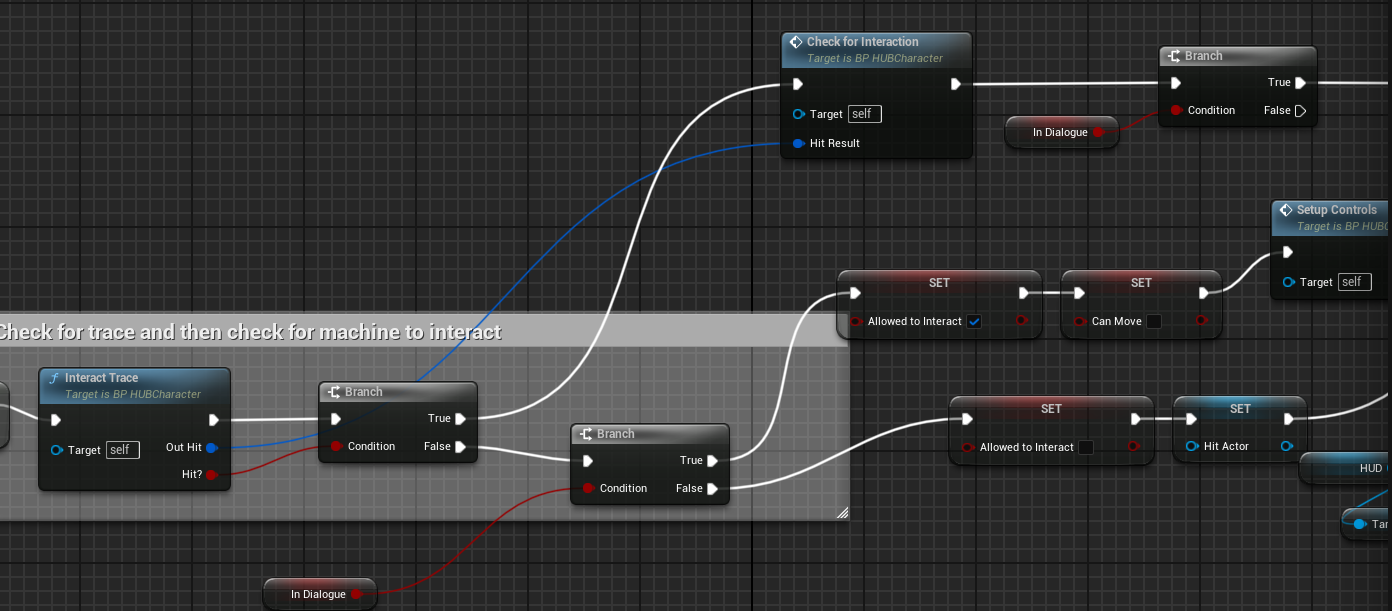
This is called on the event tick, and does various checks to see if you’re valid to interact with things.
Dialogue
The next thing I did was dialogue, since this was something I wanted to make regardless while we still toyed with ideas of how the two games would play.
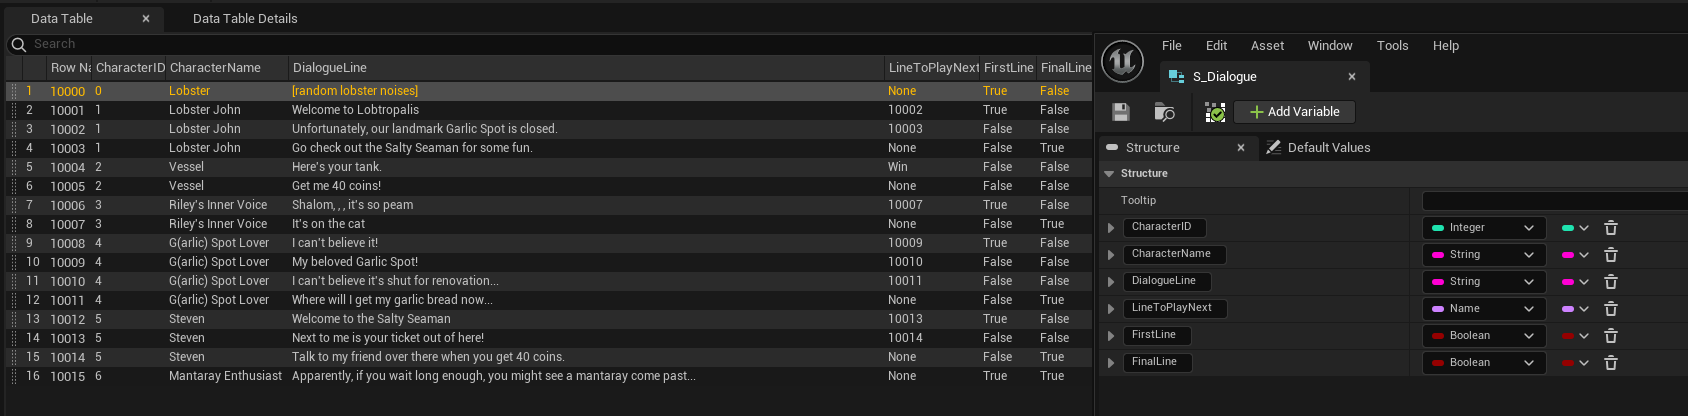
The way my dialogue system works is by using a struct and a data table containing all the dialogue for every character.
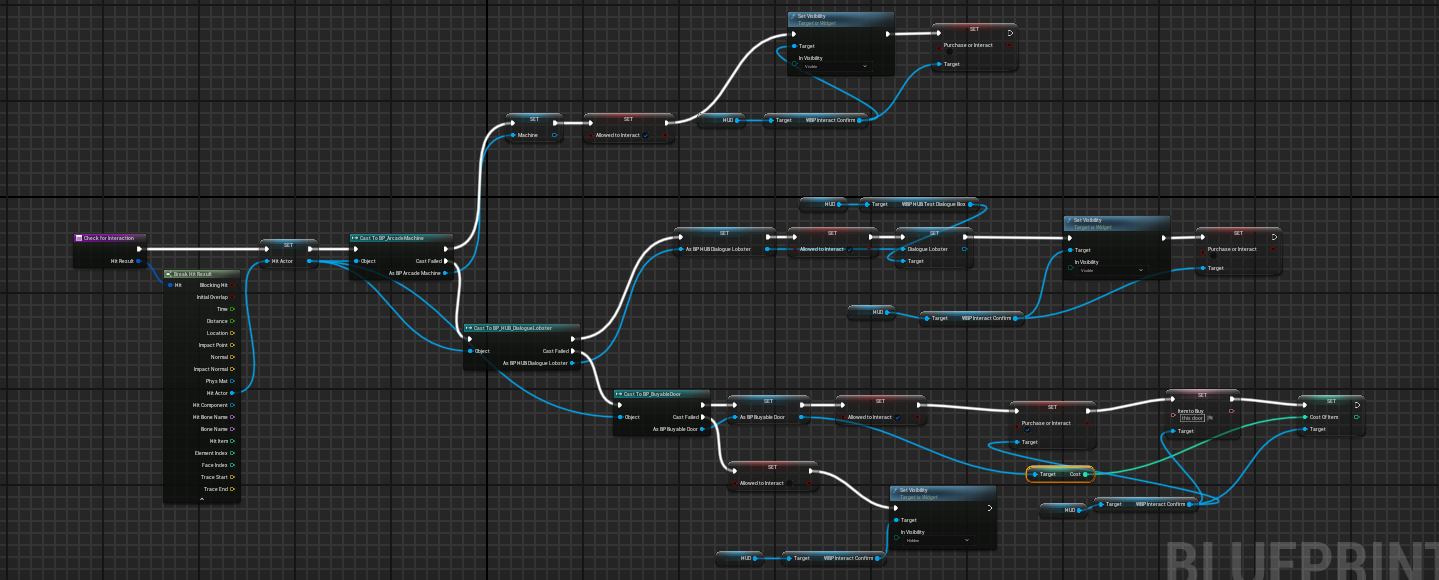
From here, I made a character blueprint called BP_DialogueLobster which you can interact with using the same line trace used to check for interacting with the arcade machine.  To start, it loops over all the lines of dialogue to find the lines specified on the lobster.
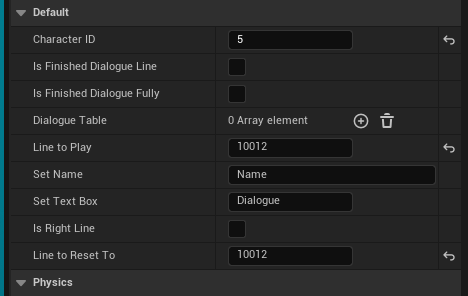
In this case, it loops over all dialogue lines until it hits the line with the name 10012. At that point, it gets all the data from that row like the name, dialogue, character ID, and the line to reset to.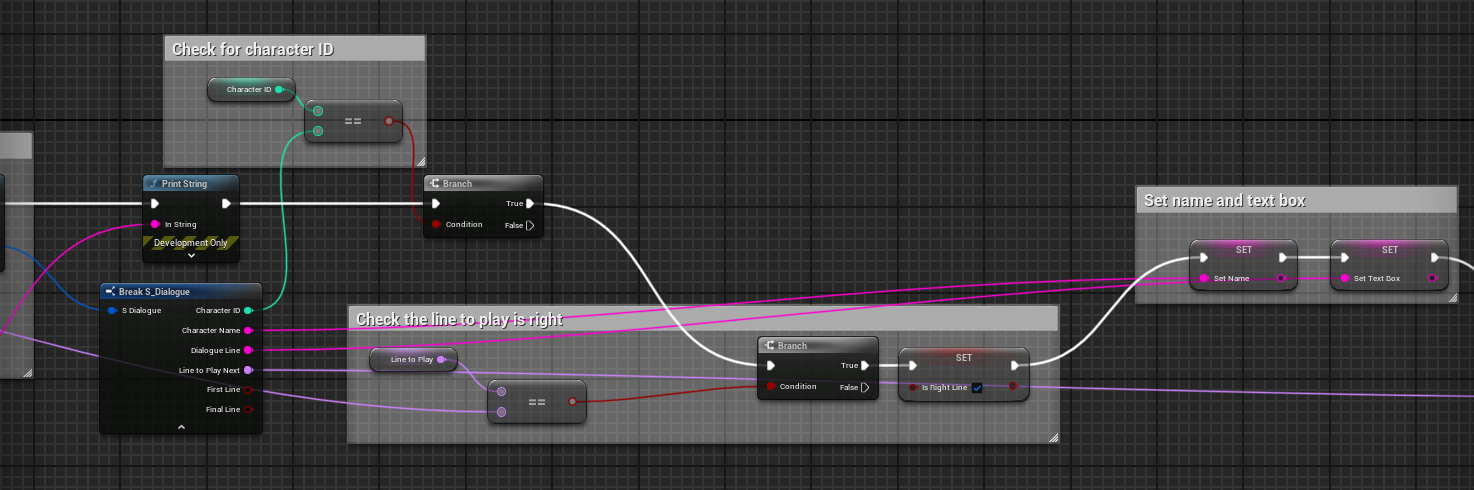
It then breaks the dialogue struct, and does checks to make sure the dialogue line is correct. After these checks, it sets the dialogue box variables to show the right info.
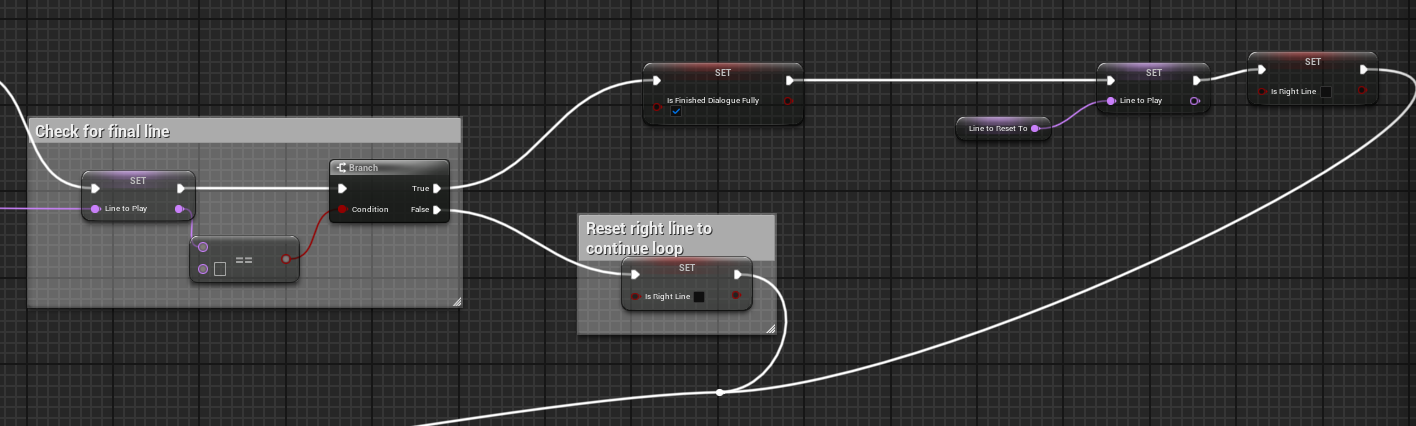
It then checks to see if there is a follow-up line of dialogue, which it does by checking the LineToPlayNext variable isn’t set to None in the data table. If it is None, it sets the dialogue to finish fully, then it disappears. after resetting the line to play to the default. If it isn’t, it loops back around to keep the player in the interact loop.
Manta Ray/Movement along Spline
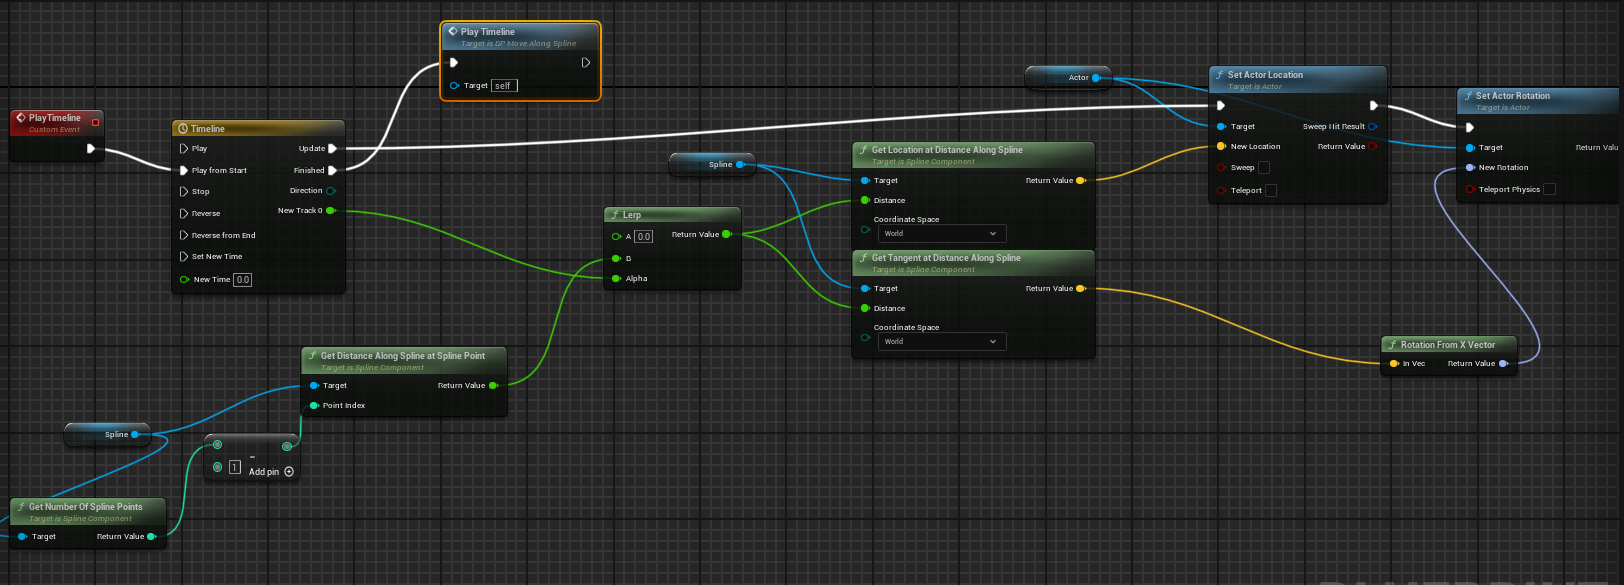
The spline movement uses a timeline going from 0 to 1 to use as the alpha on a lerp node. It gets the distance along a spline point and uses it as the target for the lerp. It then gets the value of the lerp and uses it as a location vector to set the mesh, in this case the manta ray, infinitely along the spline path.
It uses a length variable to set how fast the manta ray should travel around the spline path.
Starting Camera Transition
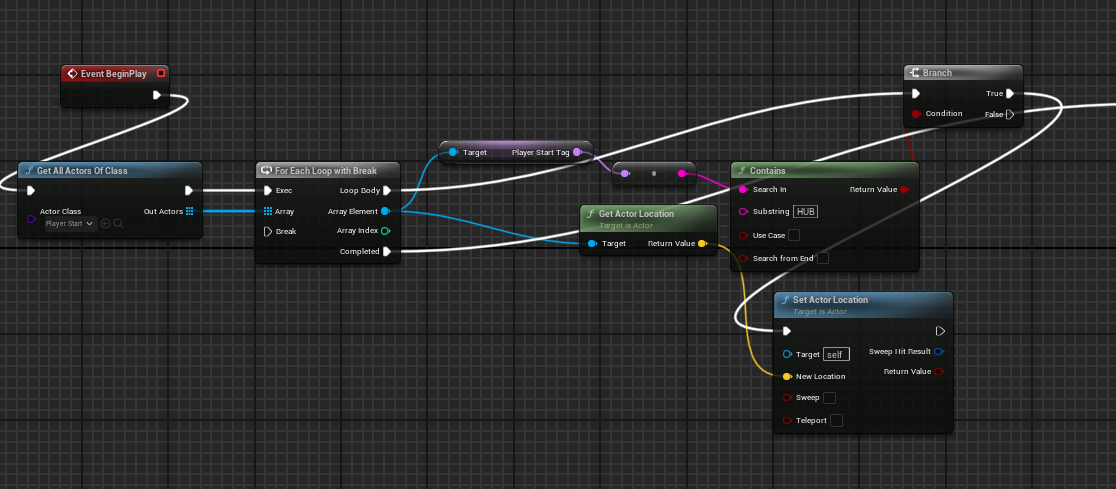
The starting camera character first starts by getting the correct player start to avoid spawning in the minigame area.
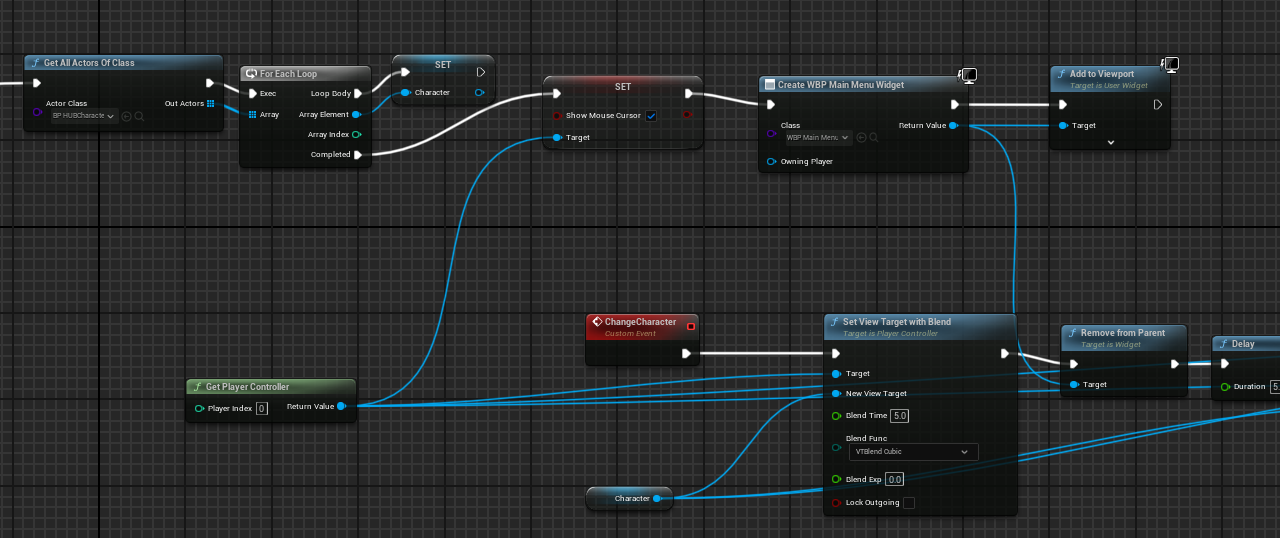
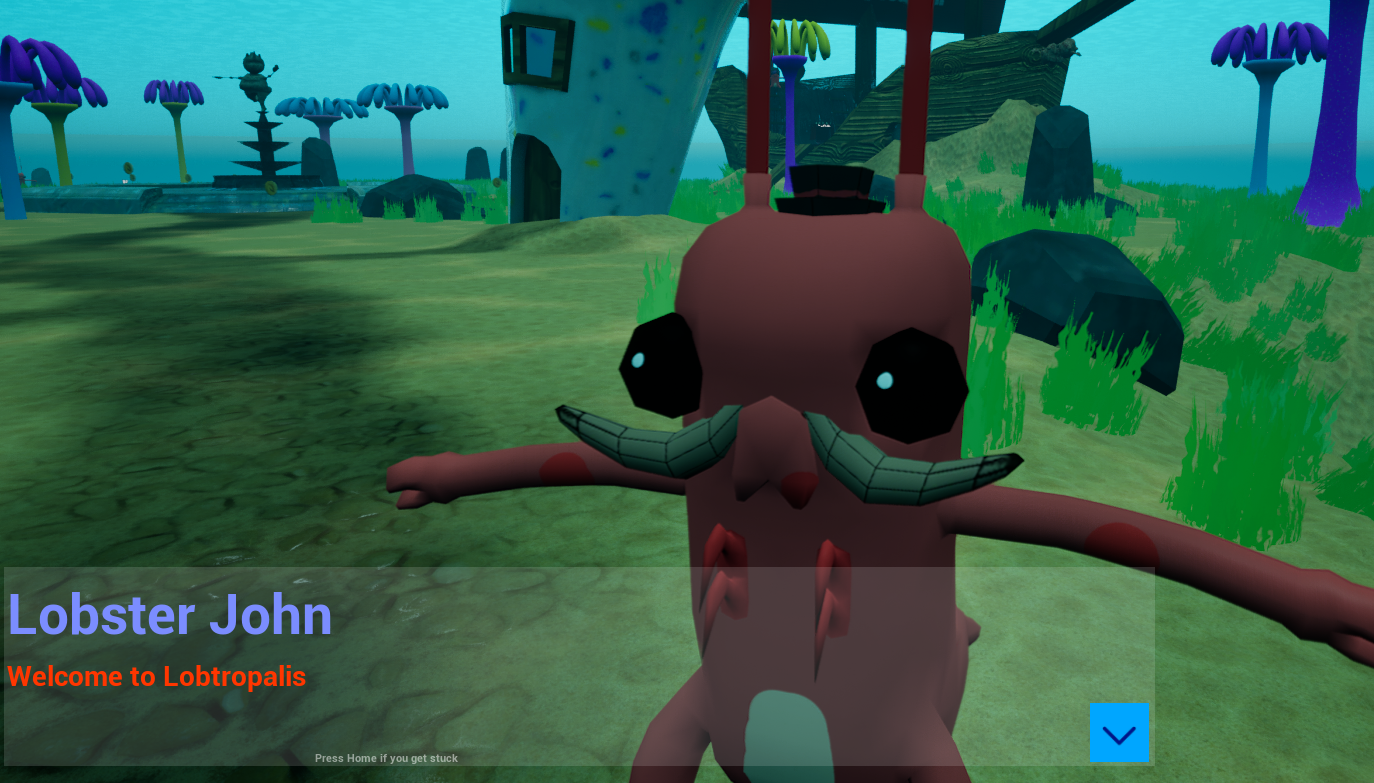
It then gets a reference to the player character, HUBCharacter, and enabled the mouse. It makes the widget and does the UI, just waiting for the player to press start. When they do, it triggers the ChangeCharacter event from the widget blueprint.

It uses Set View Target with Blend to swap the character and create the smooth transition from the starting camera to the player. It then removes the UI and enabled the HUBCharacter UI by setting its visibility to true.
Sean’s Reflection
I think overall that this project went very well. We definitely left it later than we should have which has lead to some burnout and crunch, as well as leaving things out that we wish we kept in or added in, but all in all, we came out with something very good and up to our standards.
The scope was a bit of an issue to start with, having started with a first person game, a wave shooter, with another top down wave shooter inside, but we swiftly realised that this was an awful idea to have waves in waves, and instead went for a basic 3D platformer.
I think that as a group, we have all worked well together and played off of eachothers skills.